Node-RED: How it simplifed my IoT project - and how YOU can rapidly prototype for the Internet of Things
Node-RED allows you to quickly hack together sensors, computers and online services. In this article, I will show you how I recreated my Internet-of-Things logic – in a fraction of the time that I spent writing it in Python.

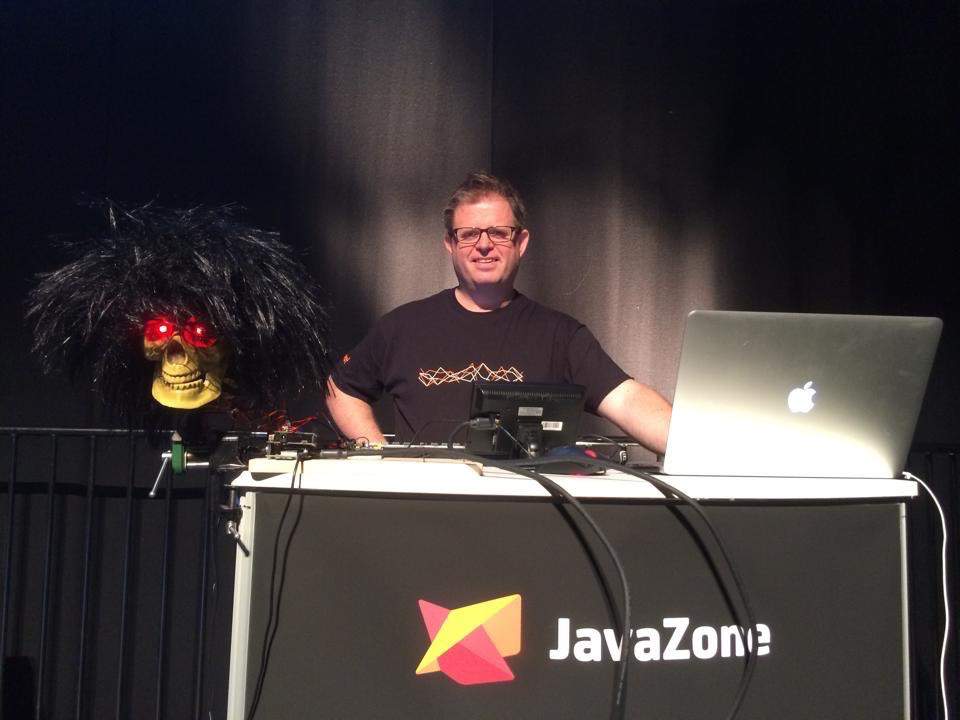
Here’s a video showing how a robot skull “senses” that a person is near, and turns to them – laughing viciously! Further down in this article, I have detailed how this was implemented by using a visual flow. In closing, I have a small wish-list for Node-RED.
In a previous article, - An «Internet of Things» demo using Raspberry Pi, Arduino, Minecraft and MQTT - I laid out the foundation of this project, giving some details about the hardware and why I chose to experiment with MQTT.
Motivation: Complex code
I came to realize that there was one big caveat with my first setup: The Python broker application became too complex for education purposes, since it had to use a threading mechanism to delay the various actions of the skull when a person comes close to the sonar.
- First, turn on the LEDs in the eye sockets
- Then turn the head
- Start making jaw motions
- ...while playing a wav file on the RasPi
- And finally turn the skull back before turning the LEDs off
If I wanted to do a trivial thing like making the skull turn left instead of right, or have it react to some other event, I would obviously have to change the code. This would really hamper my creativity and productivity. And if I was to to teach Internet of things to children, they would have to relate to concepts that are far too advanced.
Internet of Things: Lots of plumbing code
So – what if I want to use Twitter, sockets, or even IRC as inputs or outputs? The term “Internet of things” really says it all: It’s about connecting things and orchestrating them. Even in an expressive language like Python, you will find that a big proportion of the code is just about connecting things. And you need to think of pesky details like dropped connections, authentication, and so on. Furthermore, if you put your code on GitHub, you need to make sure that your security credentials are not in the actual code.
Enter Node-RED
After my previous blogpost, some people asked if I had tried Node-RED. The tool was initially built by Nick O’Leary and Dave Conway-Jones at IBM “... looking for a way to simplify the process of hooking together systems and sensors when building proof-of-concept technologies for customers”. It was first made to support MQTT, but it easily allows for integration with a range of other event providers and consumers like IRC, Twitter, Tail (file system), the serial port, websockets, HTTP requests, and so on.
Node-RED provides a graphical way of programming with message flows - a “Visual tool for wiring the internet of things”. Built on top of node.js, it provides a web interface where you can create and monitor flows. A flow is a directed graph connecting nodes. The nodes can be sources or sinks for information, or represent pieces of logic or transformation. A message-object is passed along, and you inspect and change it in the nodes. Some nodes even allow you to store data - for example in PostgreSQL, Redis or Mongodb.
Other nodes allow you to insert small JavaScript snippets to implement whatever logic you want. It is easy to reuse these code snippets, since you can load and save them using libraries. The flows themselves are actually stored using JSON, and you can copy entire flows or parts of them from the internet by copying the JSON text to the clipboard and paste it via a menu entry.
Since it is running on Node.js, you get access to the utility Node.js libraries. It is also possible to include Node-RED in a larger application. You can make your own nodes (consisting of HTML and JavaScript files) by following the directions on their website.
The creators of Node-RED offer a repository of flows on their website. So if you are going to test out a new concept, you can go there and check if someone has implemented it already. Or share your own.
If you want to learn more about the history of Node-RED and more examples of what it can be used for, please check this article on TechRepublic.
Installation and use
This article on Adafruit.com took me through the installataion, and it worked straight away (Edit: As of December 2015, it comes pre-installed on Raspberry Pi). It is very lightweight in nature, and runs comfortably on my Raspberry Pi. Then I started to re-create the scenario where the skull turns.
It was ridiculously easy, and it took me less than an hour to implement the scenario with the skull.
Since I was already using MQTT, the ease of adoption shouldn’t come as a big surprise. Speaking of MQTT: The heritage is evident in the message object, since it has two initial properties: Topic and Payload. That didn't bother me much, since one can add properties along the way.
My Python command dispatcher script just queues up the commands and forwards them to the Arduino - awaiting acknowledge. Hence, I didn't have to change it. The only practical change I had to make in order to switch from having the logic in a Python broker to Node-RED was to simply not start the Python broker. If you start out fresh - and don't need any specific logic in the Arduino - you may even use Firmata and control it directly from Node-RED.
Luckily, The folks at IBM have been clever enough to separate login credentials and flows in different files, so I didn’t need to worry about sharing the flow files on GitHub.
Node-RED makes it easy to understand how events are interpreted and dealt with, just like with MIT Scratch. So now we can demonstrate this to the young ones, and they can play with it and test various combinations that I’ve never dreamed of
...If you wonder why I keep returning to this topic: I am among the coordinators of the Norwegian movement to teach kids to code – much like code.org in U.S. or CaS/CodeClub in U.K.
Skull-turning the Node-RED way
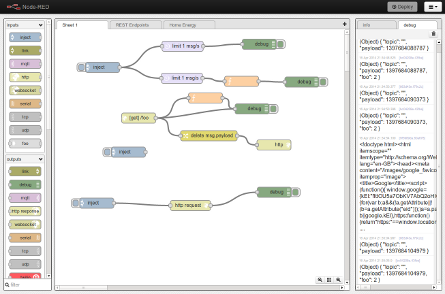
Here you see the Node-RED user interface with the available nodes on the left, and a tabbed canvas where you make the flows. I chose to use one tab for each scenario. The flow on display implements the whole scenario with the skull turning. Keep on reading, and I'll show you the details.
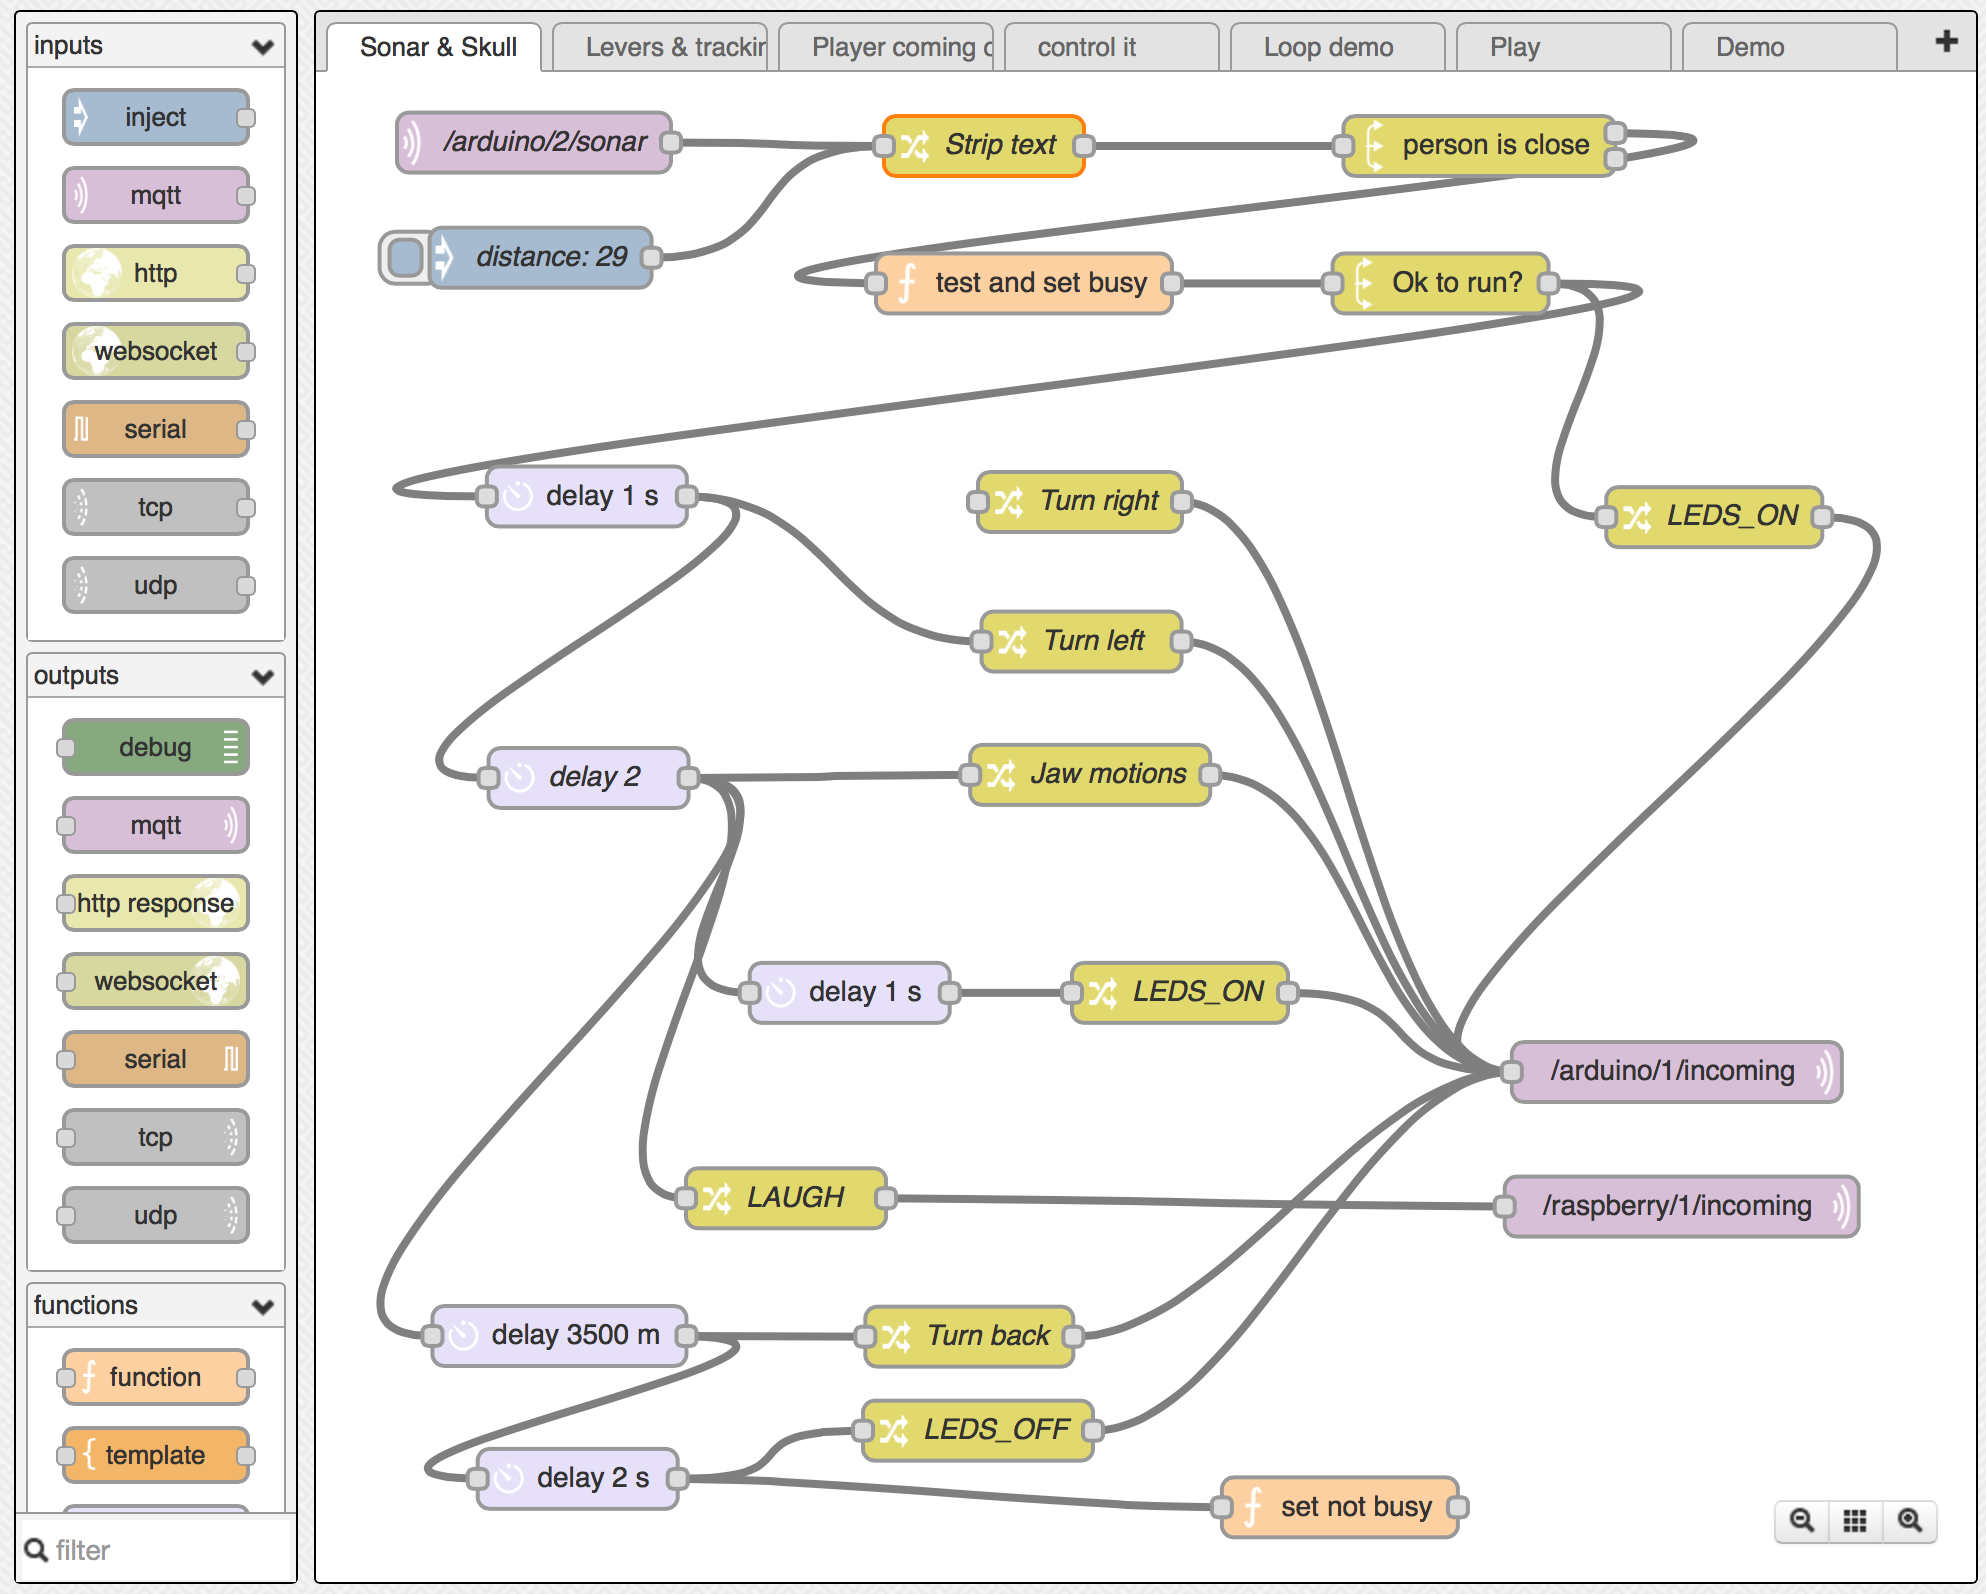
Sanitizing the input
The MQTT message reads “Ping: ”. So in order to check the Distance , I need to remove the “Ping: “ text. I use a standard replace node for this:
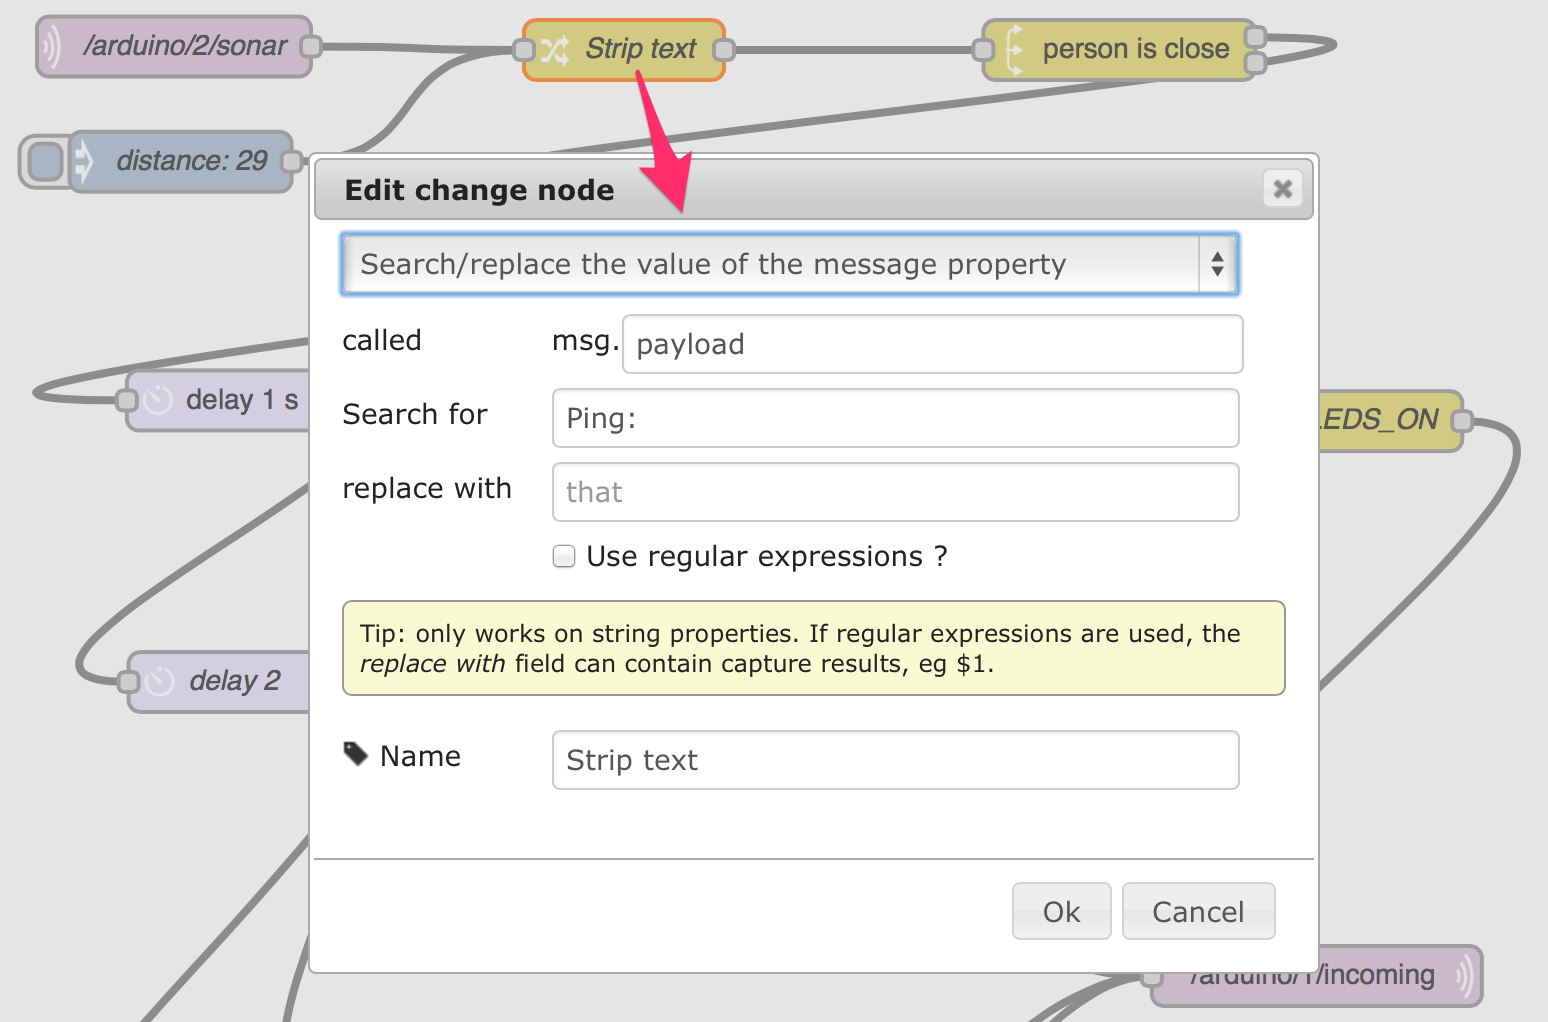
As you can see on the top left in the same screen capture, there is a handy Insert node available, allowing you to insert test messages into the flow. And you can use debug nodes to list the content of the messages in the right pane of interface.
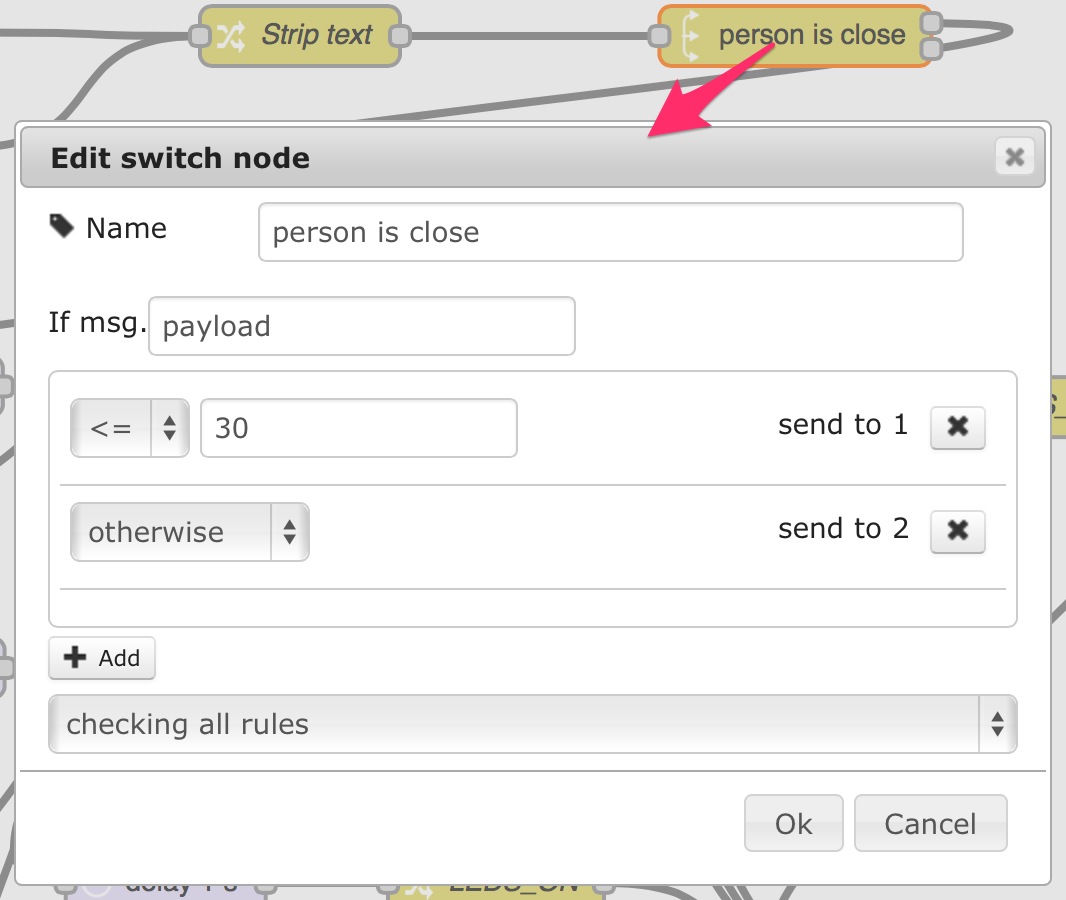
Checking: is the person close?
I use a “Switch” node for this: It allows me to send the flow in different directions, just like a “Switch” statement in most programming languages. If the distance is greater than 30 centimeters, I just terminate the flow.
Preventing parallell flows
Node-RED will of course run several flows in parallell - but there is only one plastic skull. The sonar is checked every half second, so a new instance of this flow might be initiated before the previous one was finished. Then there is also another flow, where the skull is controlled by the face tracker in Minecraft. Obviously, I needed to make sure that there is only one flow controlling the skull at a time.
In the old Python broker, I solved this by having a global variable. In Node-RED, this is where JavaScript comes in handy: There is a context variable where you can store values between invocations of a function, and it has a global property which is visible from all flows. I used this to implement a Test-And-Set-Lock mechanism. Knowing that Node-RED is single-threaded, there is no danger of race conditions.
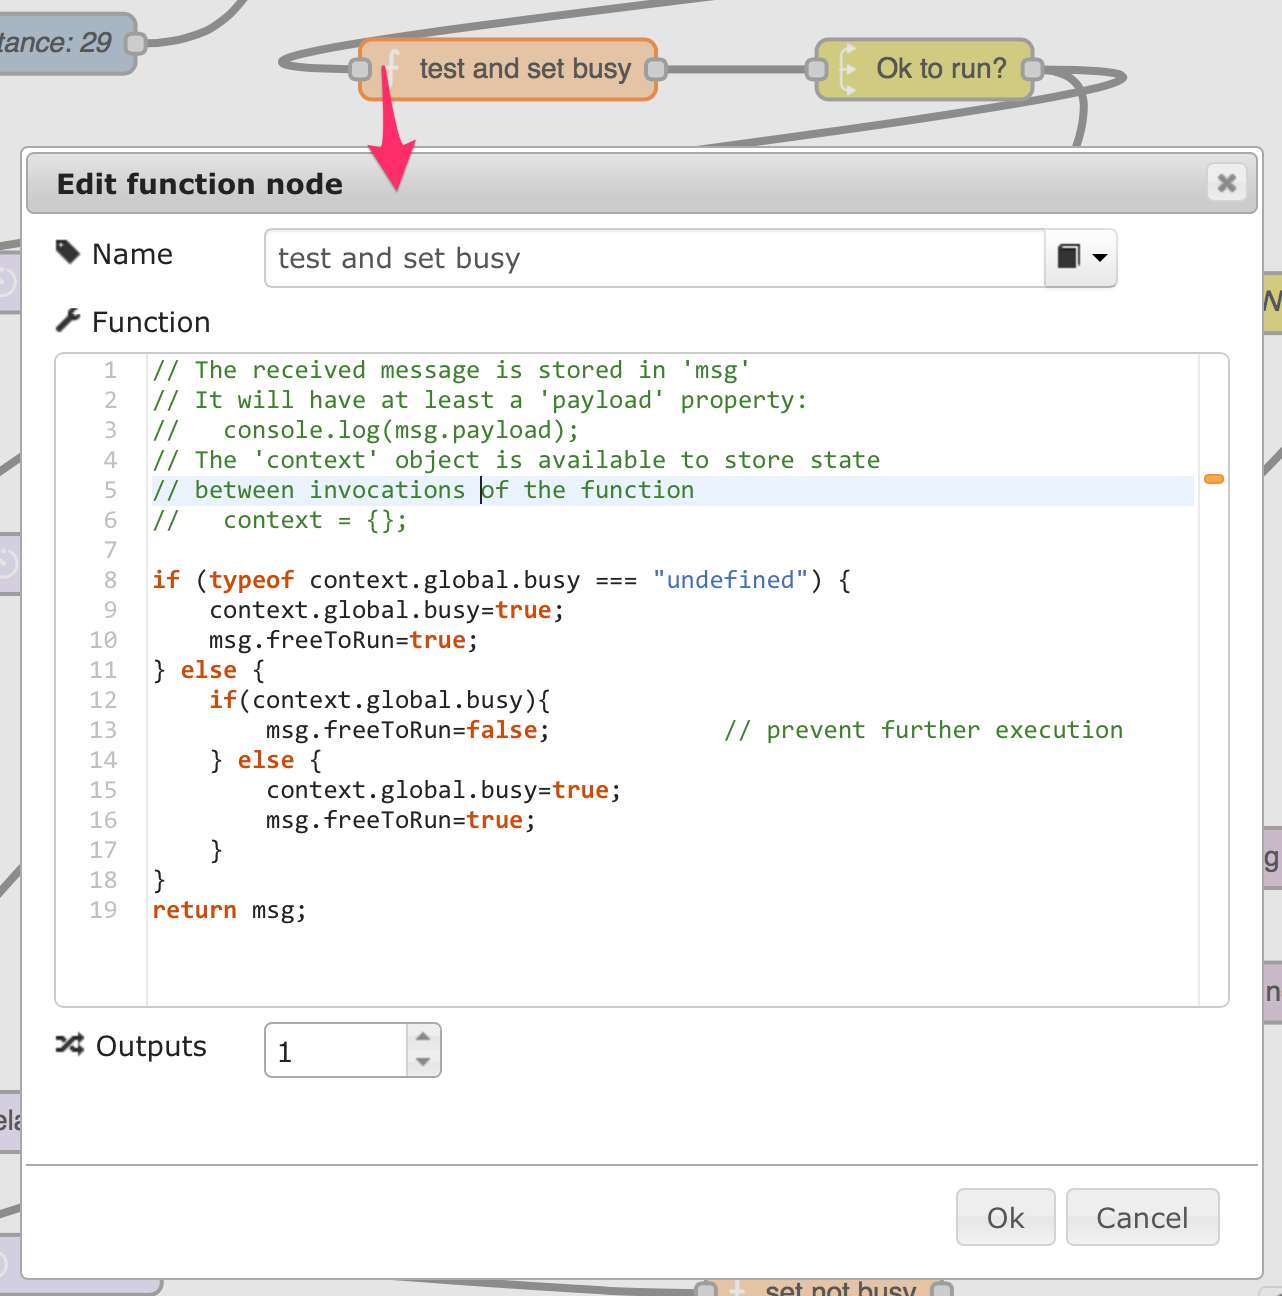
I added a “freeToRun” property to the msg object, which is pased down the line. It is acted upon in the next switch-node, and just like where the proximity of the person is verified, the flow simply stops if the value is false. The variable is cleared at the end of the flow, so that other flows can use the skull.
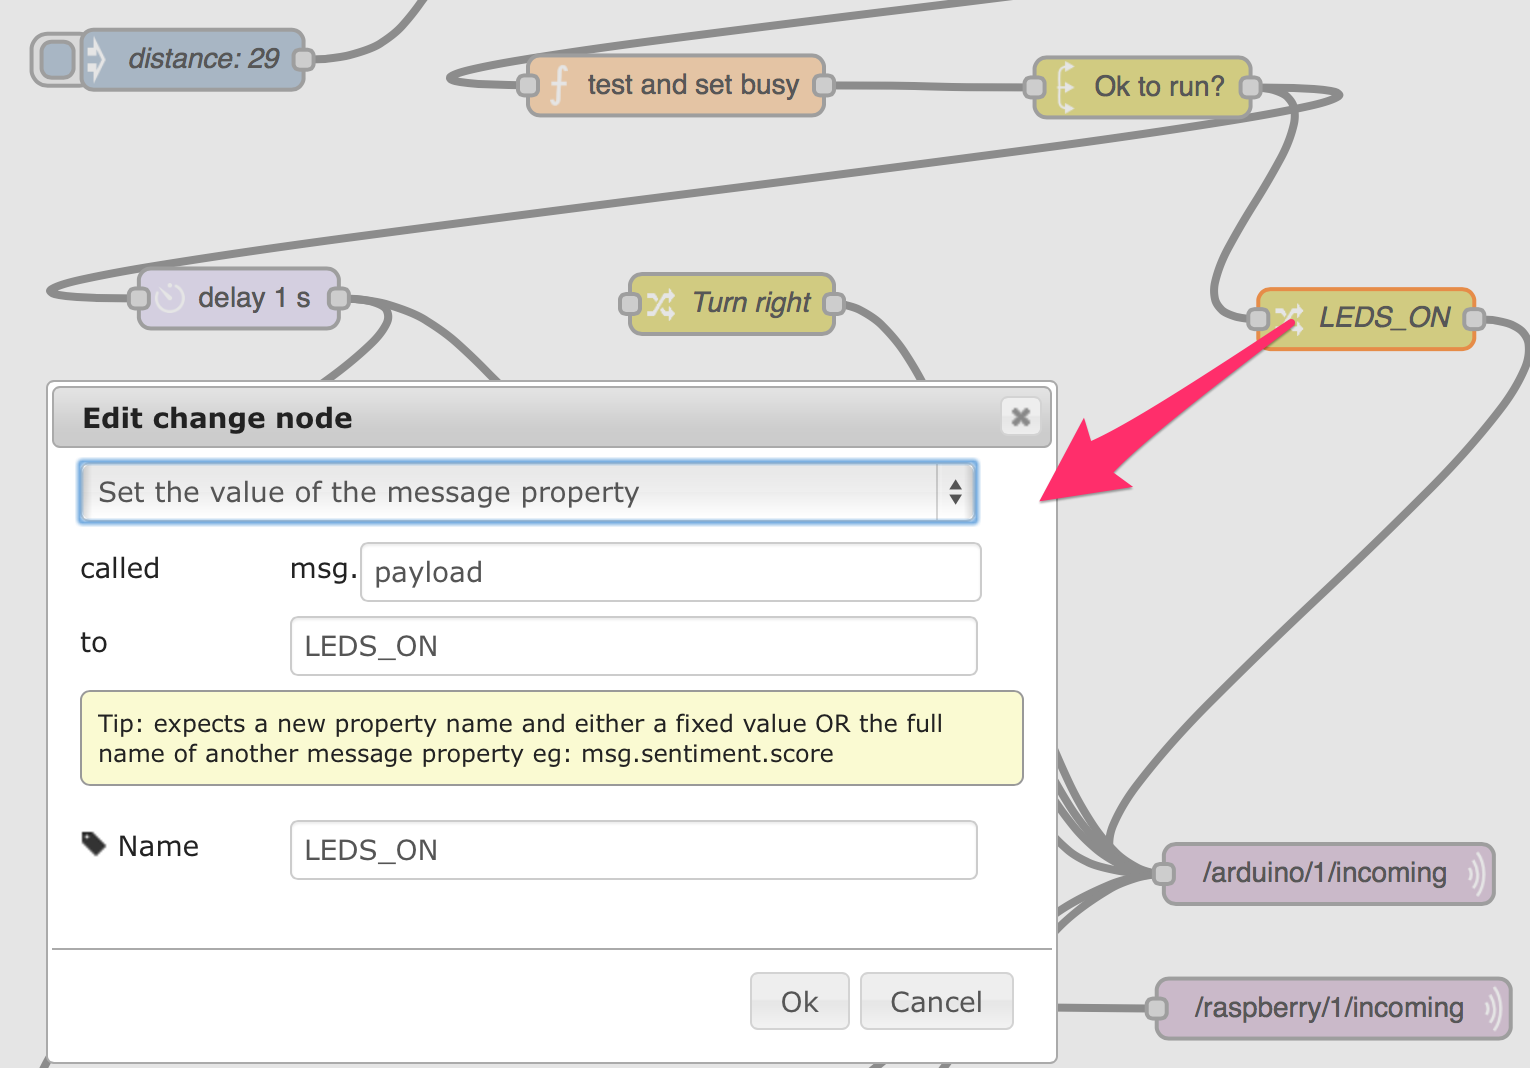
Let the fun begin
Now that I know that the person is close, and the skull is idle, I want to start to make things happen. As you can see from the screendump, I simply replace the message body with “LEDS_ON”, and pass it on to the MQTT topic /arduino/1/incoming. It will be picked up by the dispatcher Python script, which is listening on that topic and forwarding the commands to the Arduino Sketch that controls the LEDs and the servos in the skull. Now the flow is forked: A new line leads to a a “delay” node, which simply pauses for a second, allowing the eyes in the skull to glow ominously for a second before it starts turning.
Since Node-RED is providing such a delay functionality, I can very easily visualize what is happening. In the old Python broker, this was implemented by using a deferred function invocation:
Timer(1,task_turnLeft,()).start()
This is the kind of trickery that made the code difficult to understand and maintain.
Now I start to turn the skull. I accomplish this by issuing another command to the MQTT topic /arduino/1/incoming : SERVOS_MOVE,220,240,7. The first two parameters are what positions to set the servos in, and the third is the number of milliseconds to pause between each increment on the way. The result is a gradual turning in two dimensions, ominously slow (or faster, if I decrease the delay).
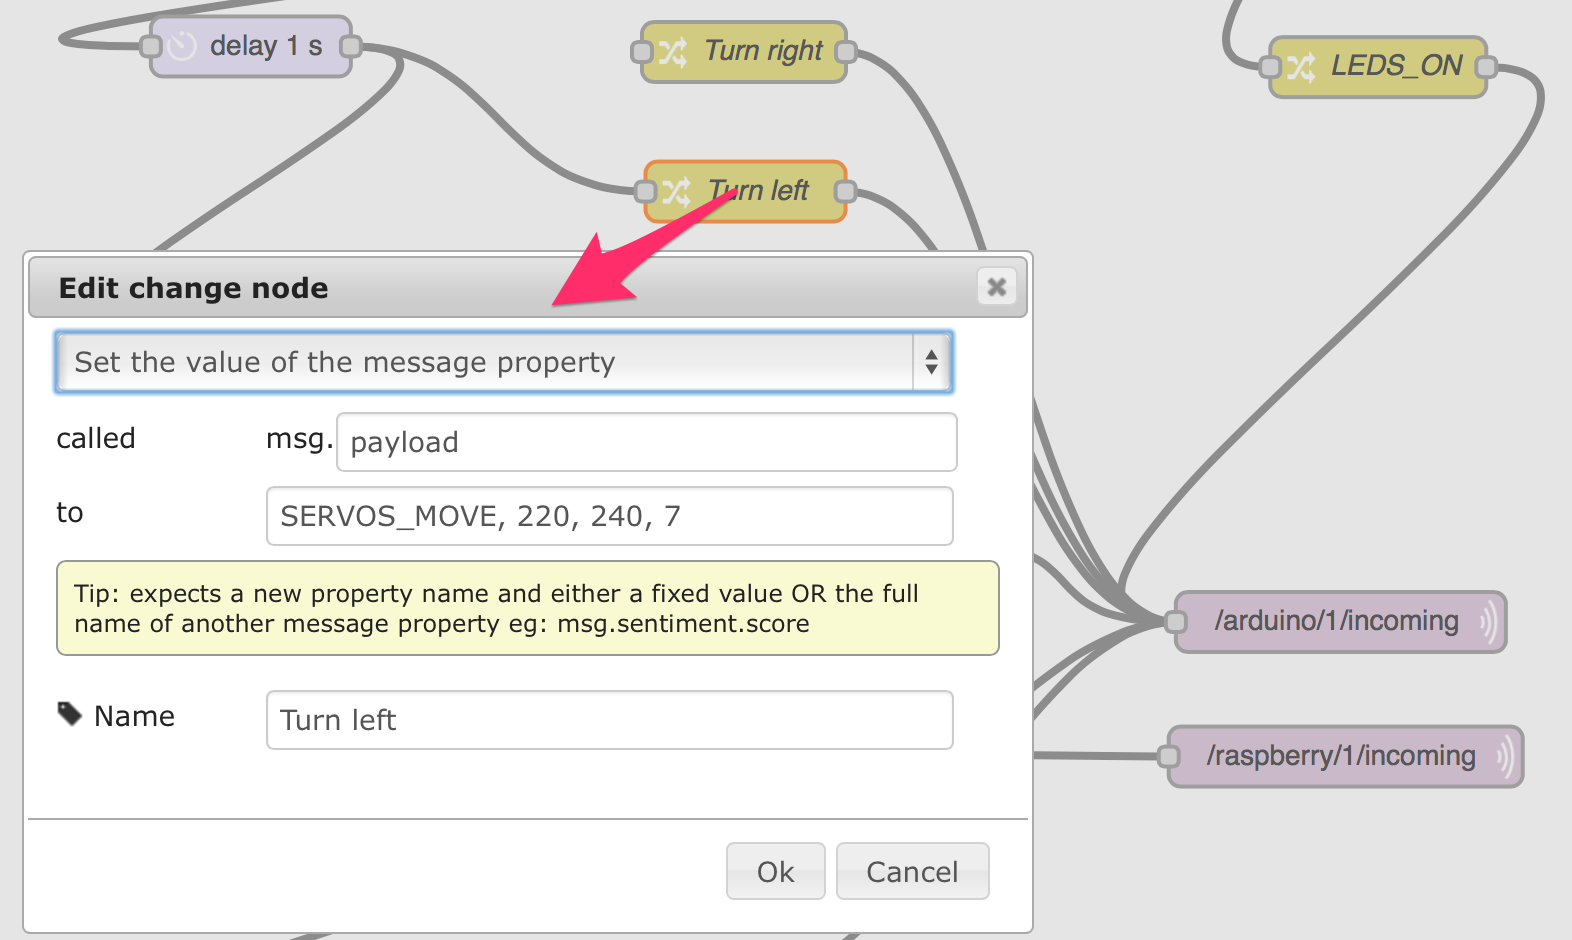
Again, I need to do a little delay to allow the skull to be positioned in an upward gaze to the left. If I should choose to have it turn to the right, all I have to do is to delete the line from the delay to the TURN LEFT node, and connect it to the TURN RIGHT node. How’s that for ease of change?
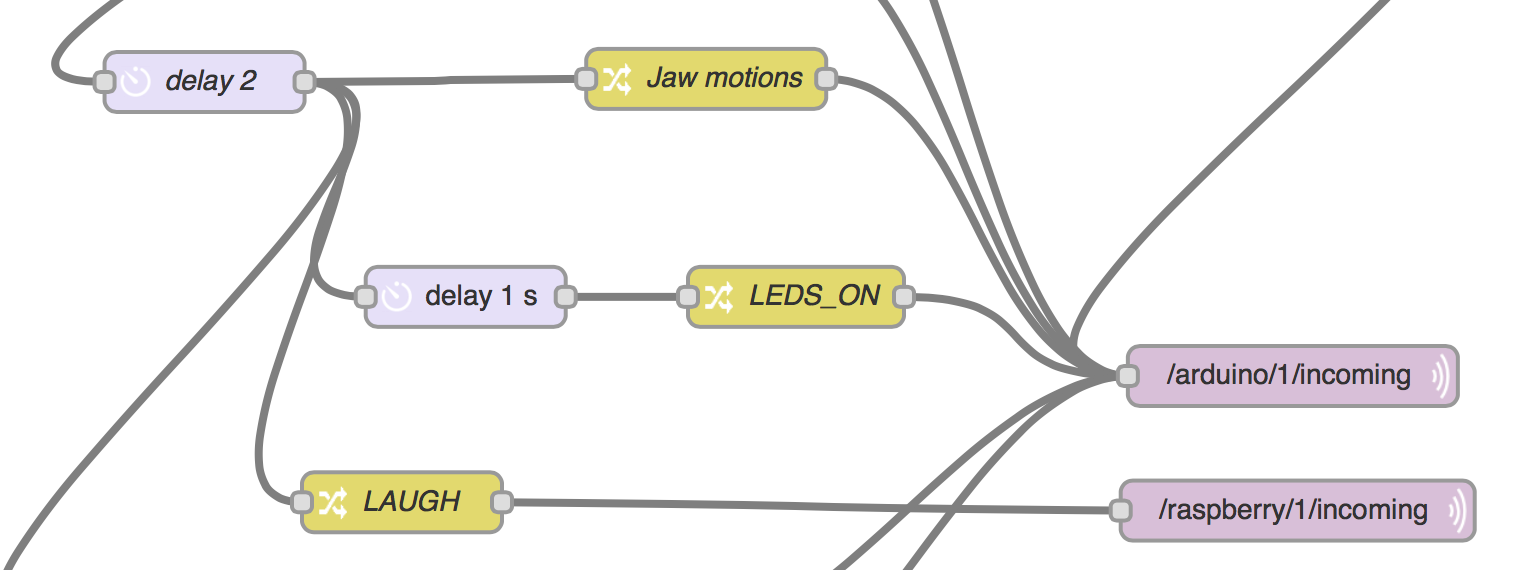
To make it look (and sound) as if the skull is laughing, I thereafter do three things in parallel: First: send a JAW_MOTION,4,1 command to the Arduino, which makes the skull open and close the jaw four times, while blinking the eyes. Since this command will turn the lights off automatically – and I want them on – I send a “LEDS_ON” command after a one second delay. The queueing mechanism in the dispatcher makes sure that this command is executed right after the jaw motions are completed, so the actual delay is effectively controlled by the time it takes to do the previous command. I also send a LAUGH command to another MQTT topic: /raspberry/1/incoming, which plays a sound file. The old Python broker used to take care of this, so I made a separate Python script that subscribes to that topic and plays soundfiles using the PyGame library
Shut up, skull!
Since you by now probably have gotten the gist of what’s happening, I won’t insult your intelligence by detailing the final actions. In short: The skull is told to look forward and turn off the LED’s, whereupon I clear the global busy flag. Voila! The skull is now idle and waiting to do whatever mischief I should fancy.
A small wish list
Concurrency: As mentioned above: Node-RED will happily begin any flow once fired, but this conflicts with my physical constraint. I therefore had to put in place an ugly global “busy” variable. and implement a shoddy mechanism. This obfuscated my beautifully simple flow, but I guess that’s a price I have to pay. I wish Node-RED could provide some sort of mutex functionality or test-and-set-lock.
A Transition that fires when all incoming events have happened
Petri net is a visual language for modelling distributed systems. It has a nice feature that I miss here: A transition where all the incoming events need to have occured before it fires. Having that, I could use the «skull is free to do things» status to make the flow more readable. It is illustrated by this diagram: The horizontal bar named “one person gets on the bus” is such a transition: You need a person and a bus that is waiting before the bus should start.
(Edit: The "Aggregator" pattern from EAIpatterns.com is a better fit, this being integration)
Wrapping it up
Having tried Node-RED, there is no way I am going back to using a program or script as a broker. The time it takes to test a new idea has been drastically reduced, and I can focus on orchestrating things instead of writing plumbing code. It gives me great flexibility, since I can extend the functionality with plain JavaScript.
Node-RED is great for what it was meant for: Prototyping. I can imagine several use cases where you need to whip something together and be super-productive without having to write lots of plumbing code. Once you and the customer have iterated a few times over, the solution may then be translated into another programming language or integration platform. Or if you are dabbling with a home automation project, you can just leave it in Node-RED.
It lacks a few features one often looks for when putting tools to serious use in an enterprise: Better security features, support for staging, failover, clustering, transactions, and monitoring - to name a few. But making it more "Enterprisey" would perhaps also eat away its charm and agility.
I can heartily recommend testing Node-RED, and I hope that this little article will make it easier for you
I recently gave a presentation (See video) about the Internet of things at the annual Norwegian Developer Conference in Oslo. Here I also introduced MQTT and Node-RED to show how you can get started with your own home automation system. I presented an updated version at the JavaZone conference: Video (In Norwegian).