- An "Internet of Things" demo using Raspberry Pi, Arduino, Minecraft and MQTT
Here's an intro to how you can get started with a Internet of Things hobby project. It may also help you to get your kids interested in coding

It started out as a halloween prank, with a skull that turns laughing when people come near a sonar: ...and was expanded to a little MQTT/Internet of things demo with "Face Tracking" in Minecraft:
Introduction
In this article I will introduce you to MQTT - a popular protocol for "Internet of Things" projects, and show how you can combine it with Raspberry Pi and Arduino as a start of a IoT project in your own home. If you are interested in teaching your kids to code, you will also find an intro to how you can mix IoT with Minecraft, hence tapping into endless possibilities for games and fun. I have a special interest in this, being one of the coordinators of the Norwegian movement "Lær Kidsa Koding!" - a cousin to code.org in the U.S. and Computing at School/Code Club in England.
Since Minecraft is wildly popular - and easy to write plugins for - it is often used as a way to introduce kids to coding. The native plugin language is Java - a language that is too advanced for most kids. To compensate for this, Walter Higgins has made a plugin - ScriptCraft - that allows you to control Minecraft with JavaScript. JavaScript is much easier to learn, and is useful to know for lots of reasons. ScriptCraft is used in code clubs and coder dojos.
I stumbled across MQTT while I was looking for ways to combine Minecraft and Arduino allowing us to introduce the concepts of Internet of Things (IoT) to kids. I posted some questions about MQTT in the ScriptCraft forum, whereupon Walter implemented support for it over a weekend! I really like his work with Scriptcraft, and hope that this article can contriute to its popularity.
Update 1: I presented this solution at NDC in Oslo in June and at JavaZone in september. See video and video
Update 2: I've re-implemented this using Node-RED: Check it out here. I have also replaced the Arduino with an Arduberry
Why Raspberry Pi and Arduino?
The Arduino alllows you to interface with the physical world using a phletoria of sensors. You can also control motors, servos, and relays, allowing you to control electrical appliances in your household.
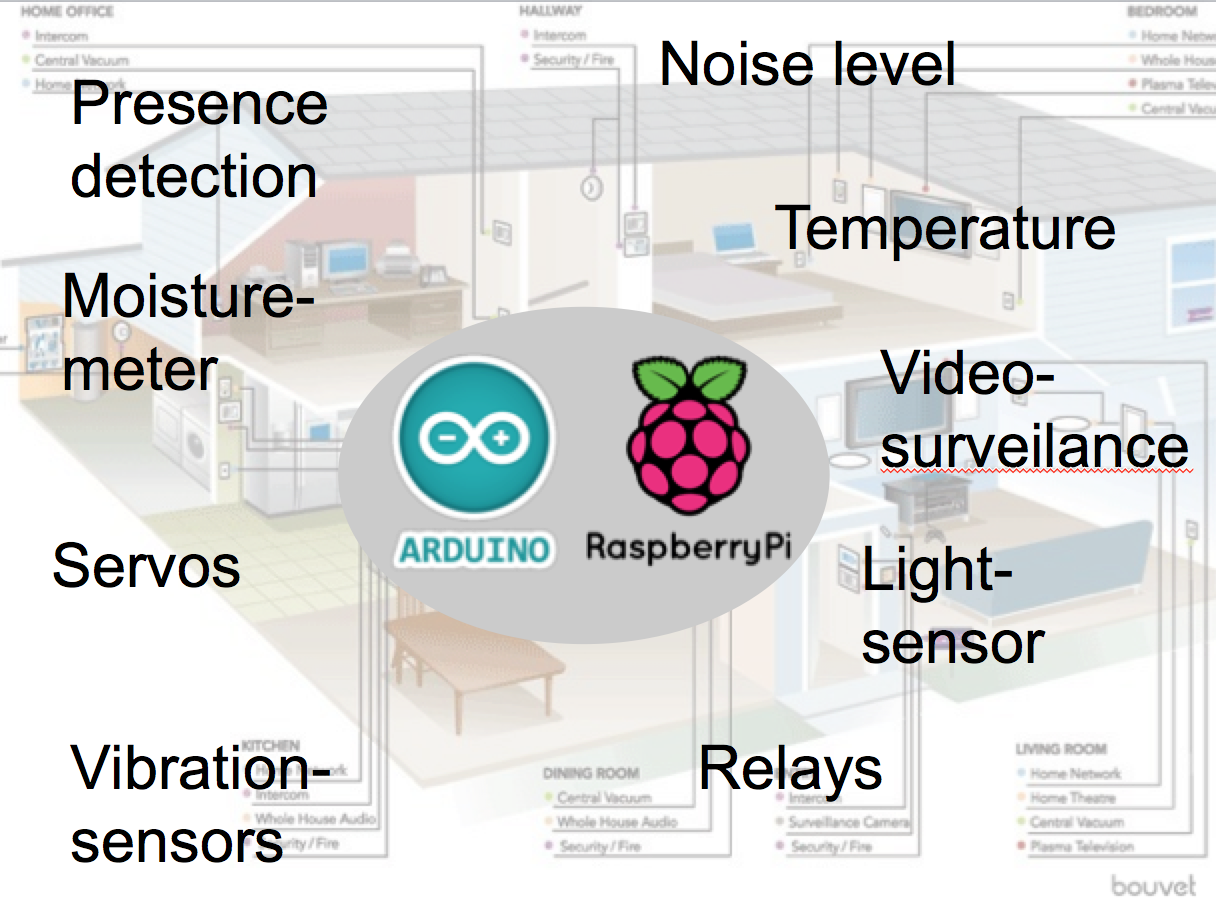
The Arduino is extremely forgiving, and there are thousands of articles on how to connect things. For communications and logic, people tend to turn to the credit-card sized $35 Linux-based Raspberry Pi. I have also found this to be the best combination, since the Arduino is rather limited in the processor- and memory-compartment.
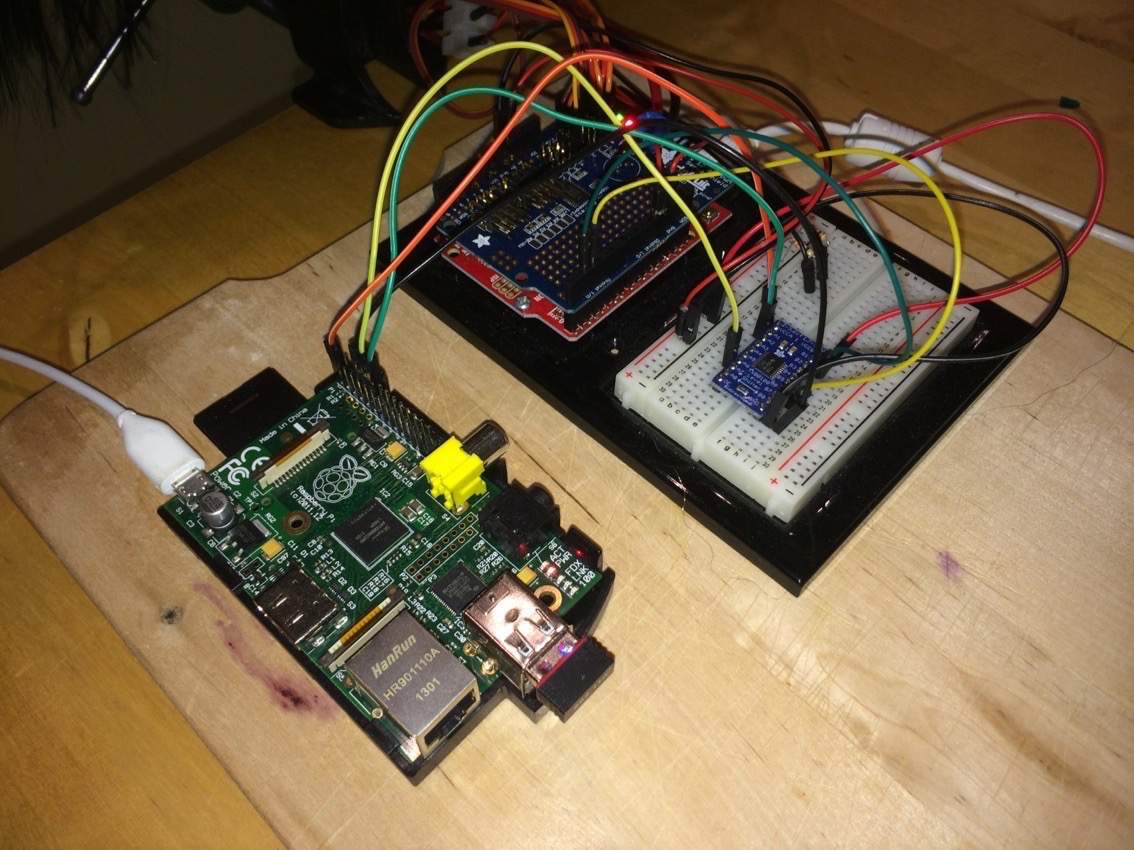
My setup
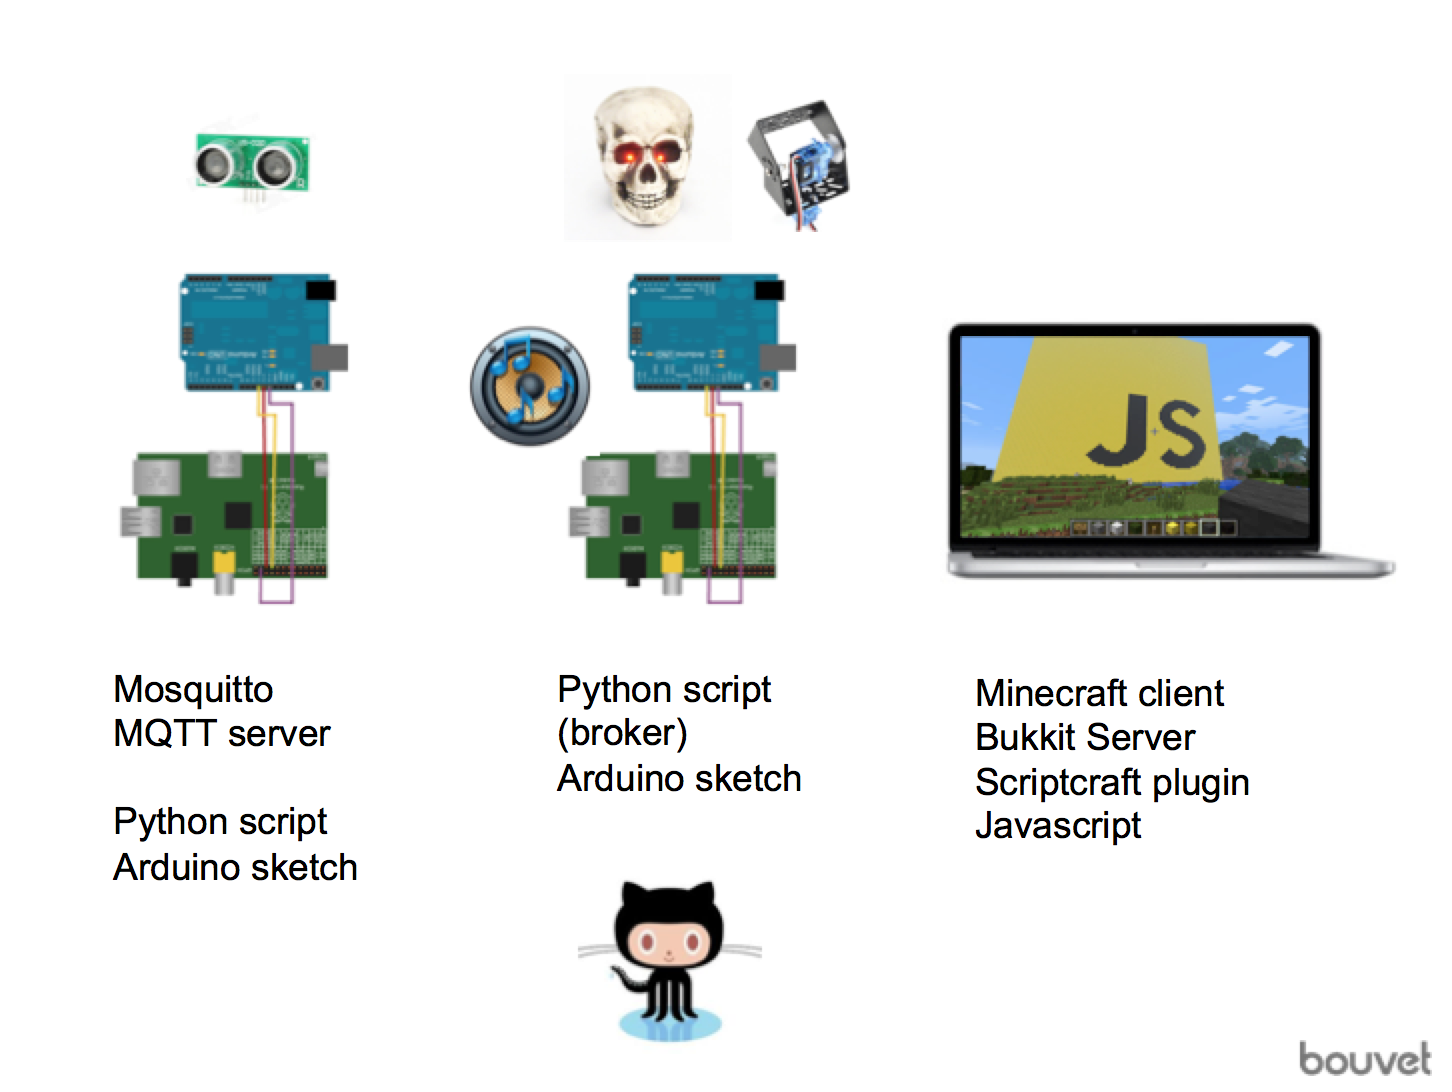
The distance readings from the sonar connected to the first Arduino are used to trigger the skull movement in the first video you saw. The second Arduino/RasPi combo controls a pan/tilt servo that moves the skull, and a third servo that moves the jaw. It aIso controls the two LED's in the eye sockets. I used the Pygame library and external speakers connected to the second Raspberry Pi for sound effects. A JavaScript is used to track player movements in Minecraft and detect if he pulls a switch or destroys a block. It is all connected using MQTT. You get a fully functional MQTT server and client tools installed on a Pi using this command:
sudo apt-get install mosquitto mosquitto-clients
Why MQTT?

In my line of work, I have been involved with messaging and integration several times, and the tools we use tend to be rather bulky, infested with large XML-configurations, and are hard - if not impossible - to grasp for kids. MQTT (Message Queue Telemetry Transport) was originally developed by IBM as an extension to the MQ Series platform, allowing it to collect measurements from devices over narrow-bandwidth connections. It is designed to be robust, has a low overhead, and has a few tricks up its sleave to handle dropped connections. It implements a simple publish-subscribe integration pattern. Since MQTT is a rising star among IoT enthusiasts, you will find lots and lots of articles about it elsewhere, and I have added some links at the end of this article. Here are some of the features that I think makes it especially suitable for IoT and hobby projects:
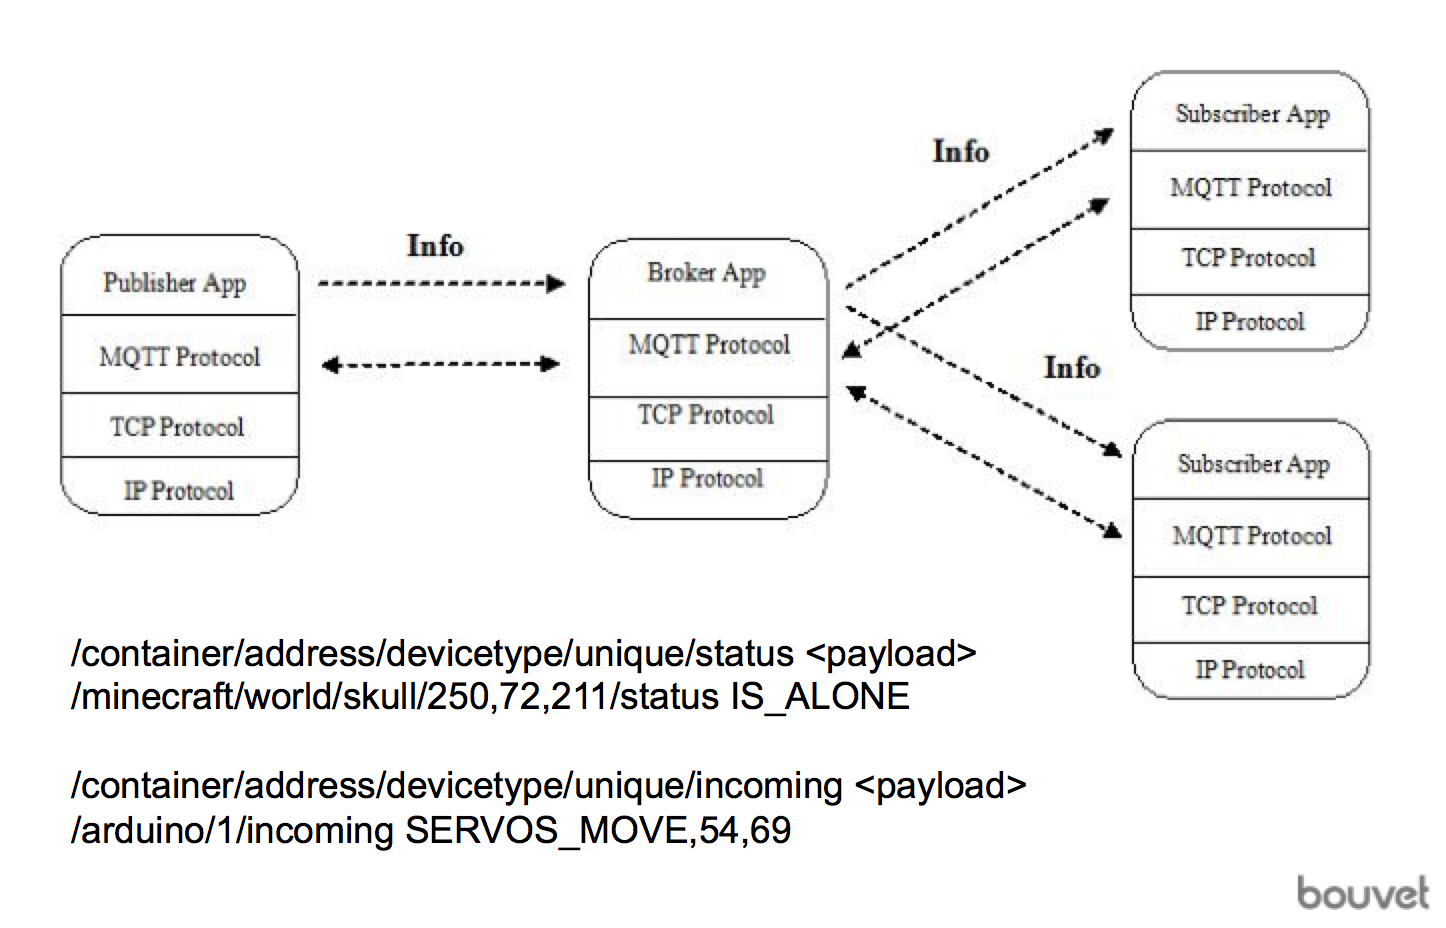
- All messages have a topic path composed of words separated by slashes. A common form is /place/device-type/device-id/measurement-type/status. The subscribers may use wildcards to subscribe to all measurements coming from a specific class of device
- The payload is binary, allowing you to use plain text, XML, JSON, or even a compressed file.
- The message overhead is just two bytes
- The bandwitdh requirements are extremely low, and the nature of the protocol makes it very energy-efficient. Here's an article comparing it to long-pulling over HTTPS
- Defunct nodes are easily discovered: A publisher can register a "last will and testament" which the MQTT server sends to the subscribers of a topic after a certain timeout.
- The programming interface is very simple, and the client memory footprint is small, making it especially suitable for embedded devices
Chances are that you are alredy using MQTT daily: Facebook messenger uses it to push notifications to all mobile clients.
The message flow
Here's an excerpt showing the messages going back and forth in my example:
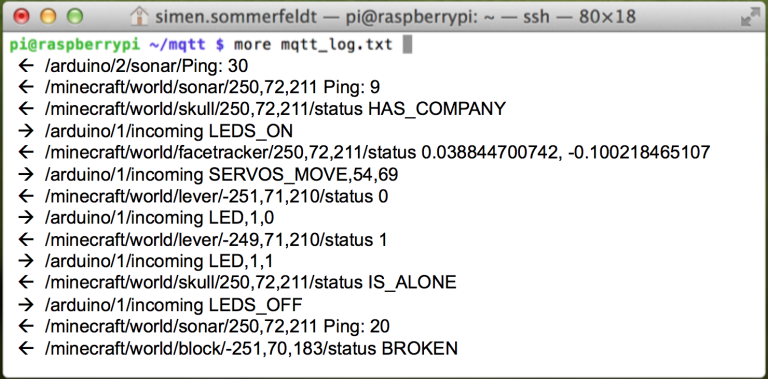
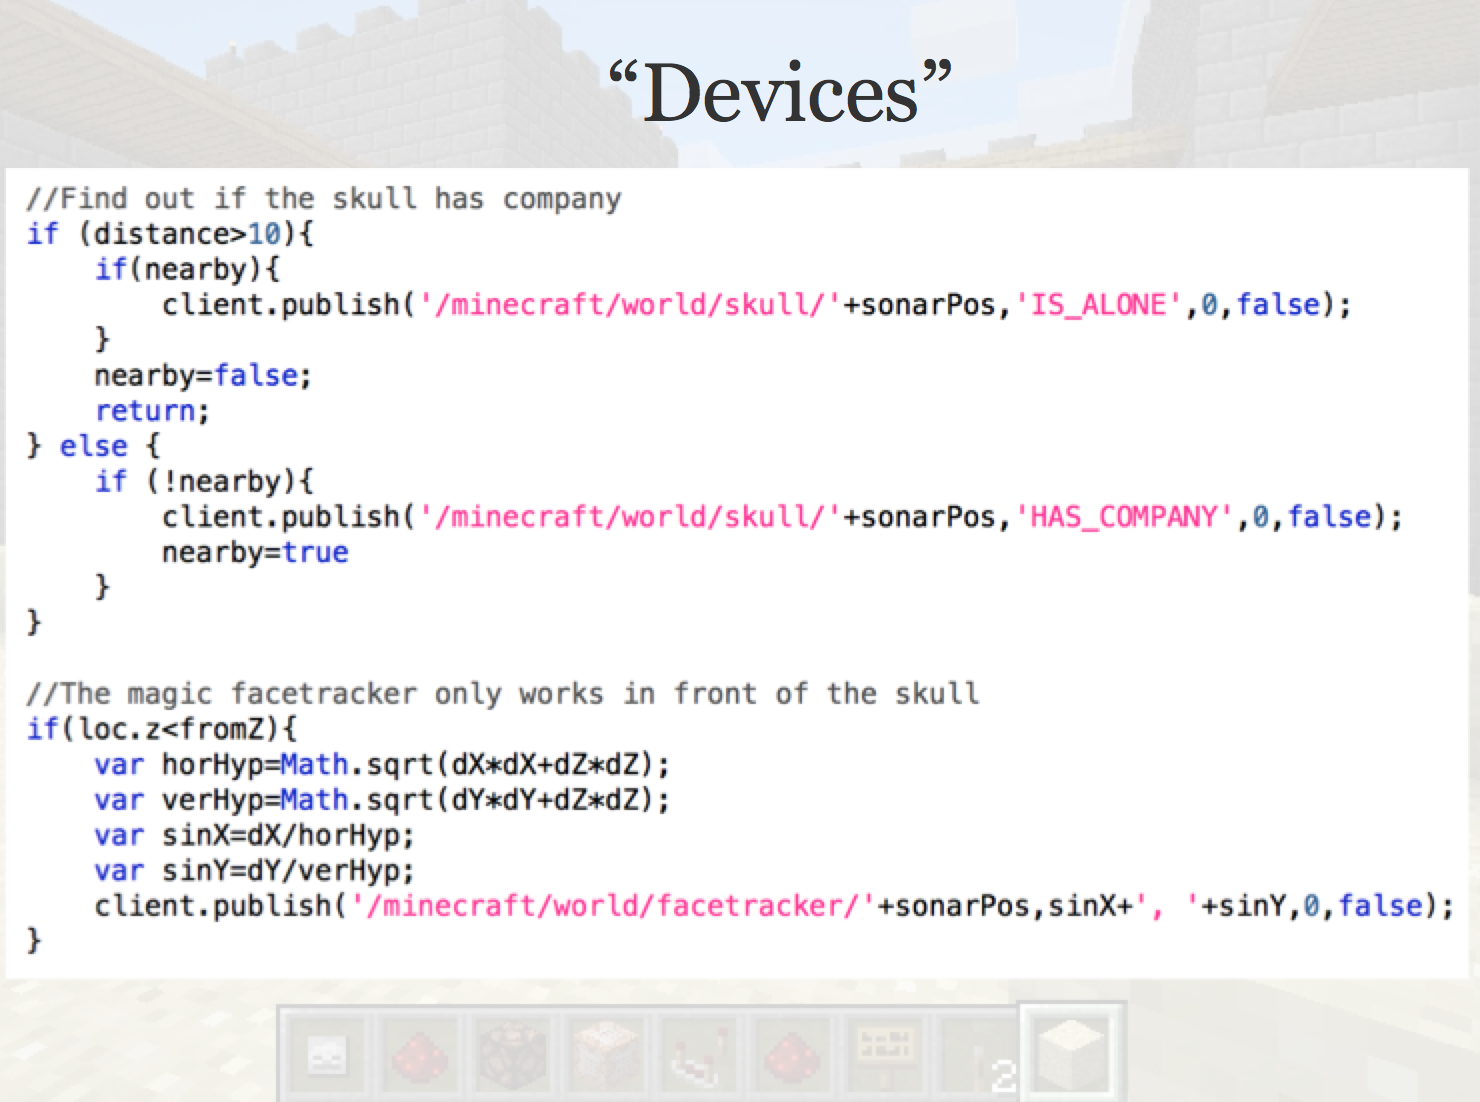
The left arrows indicate the messages that the broker receives, and the right arrows are issued from the broker. When it detects that the skull has company, it starts controlling the servos. The "facetracker" in Minecraft publishes the sine values of the vector from the skull to the player, allowing the broker to calculate the right servo positions. When a lever changes position, the LED is turned on or off accordingly.
MQTT is so simple that my children instantly could follow the message flow and suggest changes.
This illustration from IBM shows how it is customary to let a broker control the environment. It is in my opinion quite ideal for an IoT context, since several brokers can subscribe to the same sensors. The status/incoming tail of the path tells whether the message contains a command or info

I made a number of devices in Minecraft/Scriptcraft using only a few lines of code in Javascript. I bet you can think of many others.
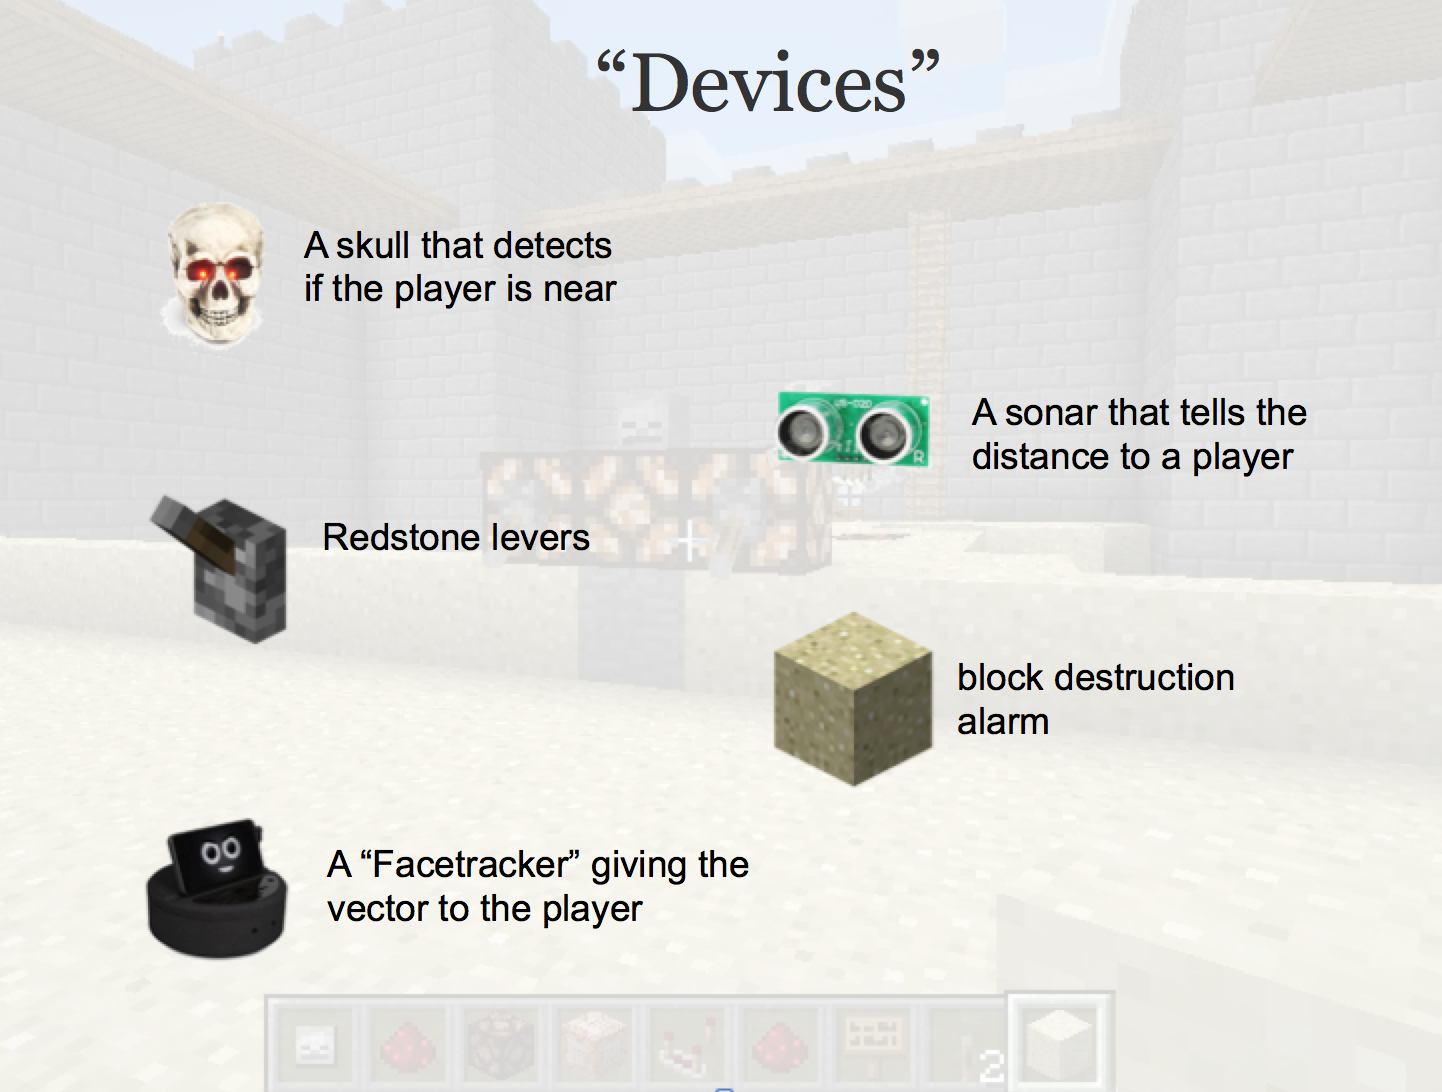
The Javascript part is pretty simple, once you get the hang of the Bukkit interface. Notice how few lines of code that was needed to implement a facetracker.
As you can see in the video, the skull movements are quite fluid, since the facetracker updates several times per second. I have ordered a RasPi camera, and intend to use the OpenCV library to make a real facetracker. I hope it won't be too scary for the kids on Halloween...
The hardware setup
Here you see the combo that controls the skull. It looks quite complicated with the logical level converter. Once I got the Arduberry, it became much, much simpler.
- The Arduino and breadboard combo I use here is the "Sparkfun inventors kit", which comes with a number of sensors, a servo and a motor. I highly recommend it if you want to get started with Arduino. It certainly eased my intro to hobby electronics!
- The Raspberrry Pi is equipped with a USB WIFI dongle. You can find them cheaply on Ebay or on Adafruit
- Since I use three servos, and they consume more power than the Arduino gives, I use a servo shield from Adafruit. You need to solder it yourselves, but there are good online instructions, and it won't take much time. The servo shield is powered by a separate power supply (1.5 amps/7 volts).
- I first connected the RasPi and the Arduino using standard USBSerial, but struggled a lot with the roundtrip times when I sent commands from the RasPi and waited for acknowledge from the Arduino. When I connected them via the GPIO pins, the roundrip time was drastically reduced
- Since the RasPi runs on 3.5 volts and the Arduino runs on 5 volts, I needed a logic level converter from Adafruit to connect the GPIO pins.This article explaints how to connect them
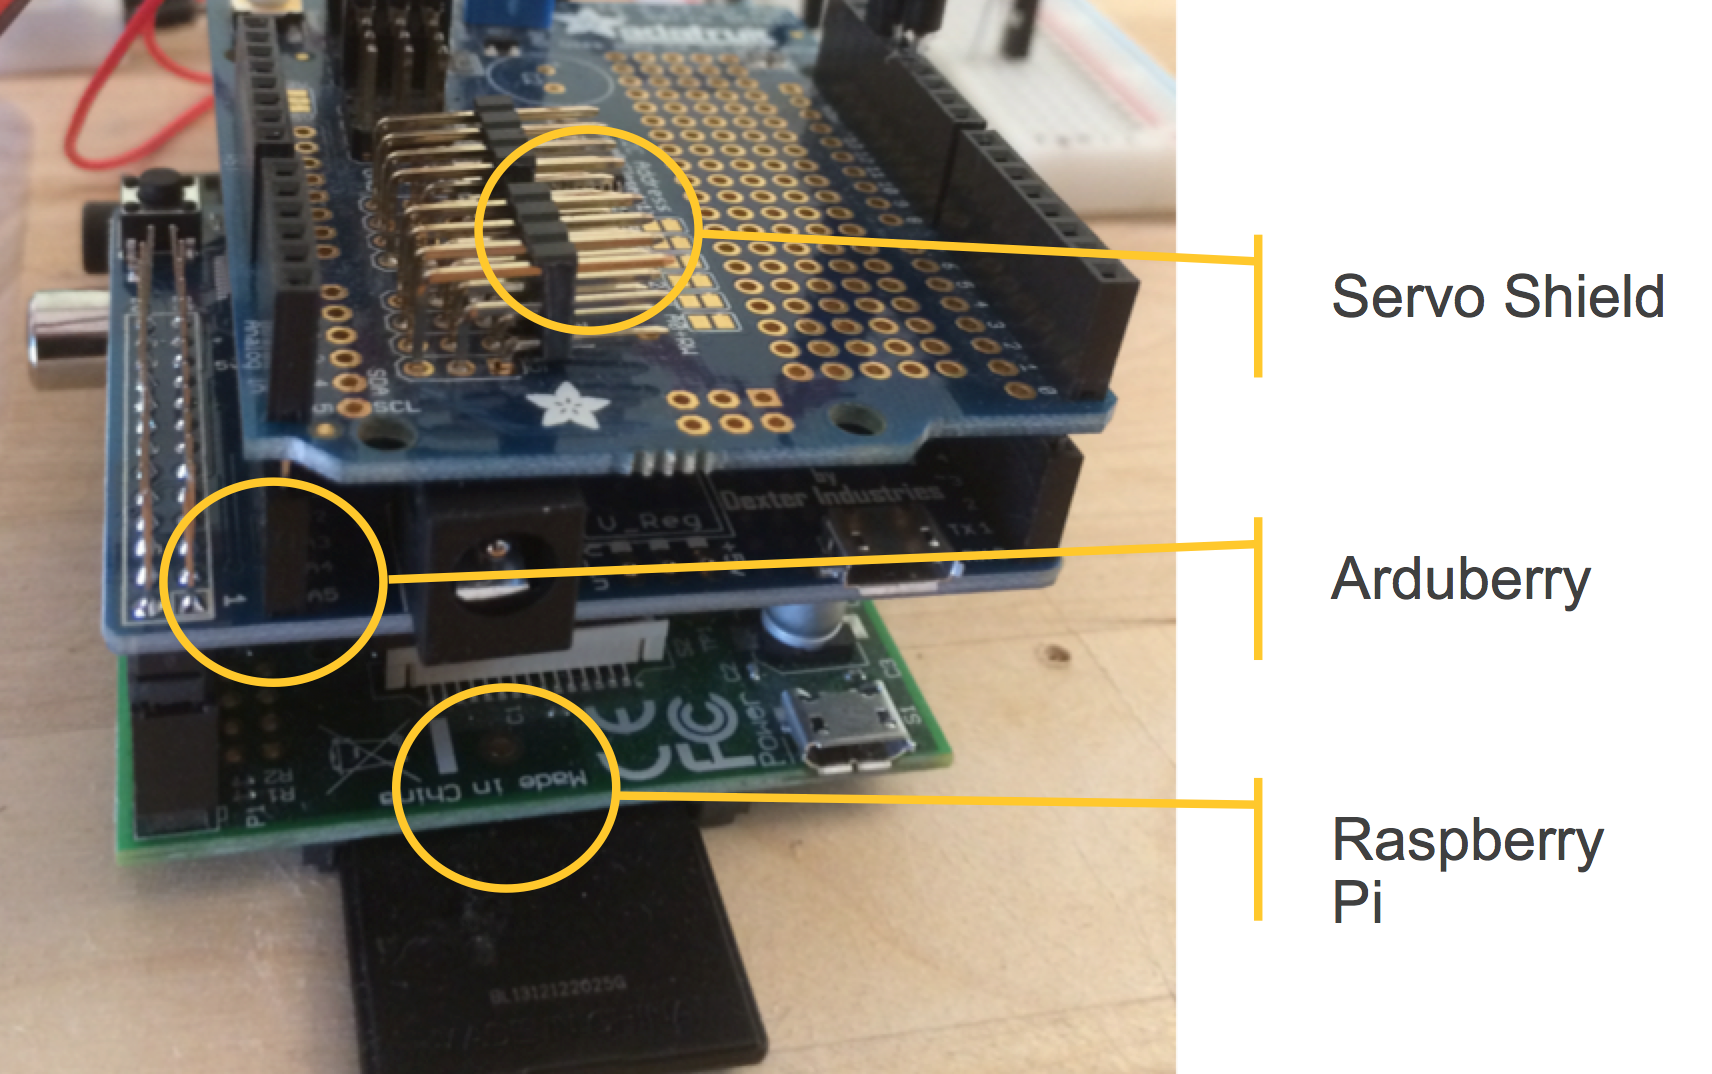
- You can omit the two whole problem of connecting the RaspBerry Pi and the Arduino by using an Arduberry - a shield you can pop on top of the RasPi. This is where you can buy one: Generation Robots Arduberry page. I still recommend purchasing the Sparkfun Inventors Kit. And hey, you get to have two Arduinos!
- The LED's in the skull are controlled by pins 12 and 13 on the Arduino. They are combined with two resistors that also come with the Sparkfun Inventors kit.
The Sonar:
- I bought a cheap Sonar from Ebay: Link to Arbitrary seller
- It is connected to another Arduino. If you have purchased both the Sparkfun Kit and the Arduberry, you can connect the sonar to the one from Sparkfun
- You need to have a separate breadboard also. They come cheaply at Adafruit or Ebay.
The Separate Power supply for the Servo Shield:
- I use a Breadboard power supply, with jumper cables to the servo shield. Here's a nice combo with a breadboard, jumper cables and all!
- This allows me to plug in a stock power supply (with adjustable voltage) that you can buy at a local electronics store (I used "Teknikkmagasinet")
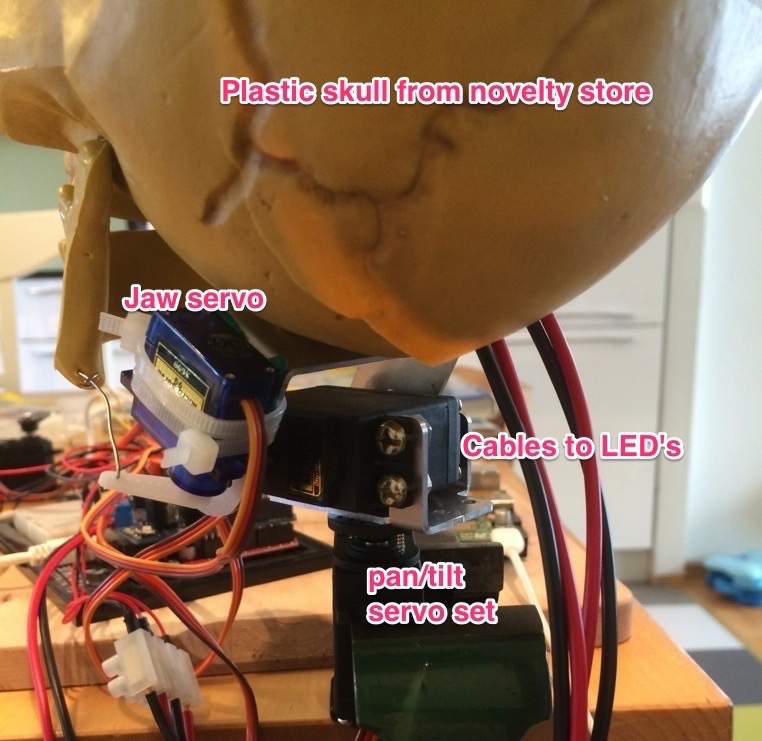
- I purchased this pan/tilt sevo set on eBay. You can find higher quality servos, but these served my purpose well, and were quite cheap. The skull is attached to the brackets using some screws and nuts I had lying around
- I used a smaller servo (SG90 Mini Gear Micro Servo 9g) to control the jaw, so that I can strap it on to the pan/tilt set. I also purchased this on eBay
- I used two vanilla LED's for the eyes
A tip: You need to test all servos to see what their limits are. Avoid using the max/min values. And the code needs to be adjusted so that it fits your servos.
The software
When you read the code, please keep in mind that I had to learn three new languages with their paradigms, while having a lot of fun. The code isn't as pretty as it should be if you want to use it professionally, but I have tried to make it readable. If you fix something, you may send a pull request :-)
Arduino sketches
softserial_srvshield_command.ino controls the skull. It communicates with dispatcher.py on the Raspberry PI. The pair implement a simple ping-pong protocol, since the servos must be allowed to complete their movements before the Arduino can accept a new command.It uses the softserial library to communicate with the RasPi through the GPIO pins.
serial_report_distance_v2 reads the sonar. It is based on example code for the sonar, not much of my doing. The Arduino (/arduino/2 on MQTT) is connected using USBSerial, since one-way communication is fast enough. The python script reporter.py is running on one RasPi and publishes the sonar readings to MQTT
Python scripts
reporter.py simply reads the sonar distance from Arduino 2 and publishes them to MQTT
dispatcher.py subscribes on MQTT commands for Arduino 1, and queues them up internally, allowing each command to be executed and acknowledged.
broker.py is the brains of my IoT setup. it subscribes to MQTT reports from both Minecraft and Arduino 2, and sends off commands to Arduino 1 or uses the internal speaker via Pygame. I needed to keep the main thread "alive" to monitor the queue, so I use Pythons (rather poor) multihreading capabilities to delay execution of some commands.
Or you can use Node-RED instead of the python Broker!

I re-implemented the logic using Node-Red. Much more fun and much much more suitable. Check out this article: Node-RED: How it simplifed my IoT project – and how YOU can rapidly prototype for the Internet of Things. The link to my Node-RED flow on Github: flows_raspberrypi.json
Javascript code for ScriptCraft
leverpull.js is loaded using the js refresh() command in the shell that starts the minecraft server. You need to execute it AFTER you have logged in to the Minecraft client so it can "find" you. It subscribes to the player move, lever pulled, and block break events, and publishes a number a number of messages to MQTT, implementing the "sensors" that I described above.
License
Everything can be found on Github. Feel free to copy and use as you like. It is licensed as CC-BY-SA.
Where to go next
Node.red is a node.js framework you can use on top of mqtt. There is also the openhab-project, where mqtt can be one of several providers.
For more complete solutions, Forrester Research pays special attention to the following pioneer vendors:
I have also been made aware of thethingsystem.com and nornir.no.
It is early days, and It may take a long time until the world agrees upon the standards that can take IoT to general acceptance. In the meantime, it is fun to play with Arduino and Raspberry Pi!
Links related to MQTT and IoT
- TED video where MQTT co-creator Andy Stanford-Clark talks about IoT and other things: http://www.youtube.com/watch?v=s9nrm8q5eGg
- http://iot-datamodels.blogspot.no
- http://mobilebit.wordpress.com/2013/05/03/rest-is-for-sleeping-mqtt-is-for-mobile
- http://www.slideshare.net/nivertech/zvi-mqtts-foreuc2013
- http://jpmens.net/2013/02/25/lots-of-messages-mqtt-pub-sub-and-the-mosquitto-broker/
- http://embeddedtek.blogspot.no/2013/02/internet-of-things-sous-vide-cooker.html
- http://mqtt.org/wiki/doku.php/history
- http://public.dhe.ibm.com/software/dw/webservices/ws-mqtt/mqtt-v3r1.html#appendix-
- http://www.eclipsecon.org/na2014/session/securing-internet-things-and-mqtt
- http://server.dzone.com/articles/controlling-house-50-miles