Learning JavaScript and Arduino programming with Johnny-Five
Read on to find out why I learnt JavaScript by programming robots, and get some hints for how you can join the nodebot revolution.

Why JavaScript?
Almost all my programming experience comes from writing server-side code with Java and Spring, but as a wise man once sang, the times they are a-changing. The Java Platform now supports multiple languages from different programming paradigms and technologies such as node.js have brought JavaScript to the server side. Our toolbox is evolving and we developers need to make sure that we are not left behind!

So why did I choose to begin with JavaScript?. To start with, $$$. The market is crying out for JavaScript developers! In addition, you can pretty much create a full stack application with JavaScript. For an old backend developer like me, JavaScript knowledge will open up the front end, while giving me alternative tools for both server side (i.e. node.js) and database (i.e. TaffyDB) development.
The JavaScript ecosystem is undergoing a huge amount of innovation right now. New libraries and frameworks are becoming available constantly. For me this makes JavaScript an exciting place to be, with seemingly limitless possibilities.
And finally, Atwood's Law states that any application that can be written in JavaScript, will eventually be written in JavaScript. If this turns out to be accurate then we can all expect to write some JavaScript at some point in our lives as developers!
Why the Arduino Uno?
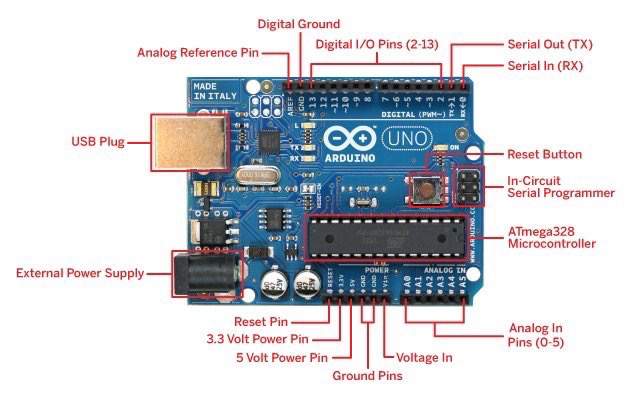
A main motivator for using the Uno was that I had one lying around in the office, so I could get cracking straight away! Note that theres lots of alternatives to the Arduino Uno, such as the Raspberry PI, Netduino and Spark Core as well as other Arduino models. All of these alternatives have different strengths and weaknesses, and should be evaluated depending on the goal of your project.
Getting started with JavaScript on the Arduino Uno
To perform the following steps you'll need an Arduino Uno, a USB Cable and a laptop.
First, lets set up the Arduino Uno so that it is ready for accepting JavaScript commands:
- Begin by downloading and installing the Arduino IDE.
- Connect your Arduino to your computer with the USB Cable, and fire up the Arduino IDE.
- Ensure that the the correct serial port is selected in the Arduino IDE (via Tools-Serial Port). If you get this wrong you won't be able to perform step #5 below. If this is the case, try switching between the USB serial port alternatives (it should be something like /dev/cu.usbmodem1421).
- Open the Standard Firmata sketch (via File->Examples->Firmata->Standard Firmata) in the IDE.
- Upload the Standard Firmata sketch to your Arduino Uno.
What we have done here is install the Firmata protocol on the Arduino Uno. This protocol will allow us to use JavaScript (or other languages) to control the board via a REPL. Simply put, Firmata is an API running on the Arduino which the JavaScript (or any other language) running on your laptop can call to manipulate the Arduino.
Our next step is to get a JavaScript environment up and running:
- Install node.js on your laptop. This will include npm, which is a useful package manager for JavaScript (not unlike Maven for us Java coders).
- Create a folder for your source code.
- Create the following Package.json file in your source code folder.
- In the Command Prompt, change directory to your source directory and run npm install.
{
  "name": "LedBlink",
  "version": "0.0.1",
  "description": "Johnny-Five example",
  "dependencies": {
    "johnny-five": "^0.8.29"
  }
}
In this step you installed all you need to run JavaScript against the Arduino. We will be using the Johnny-Five library for communicating with the Arduino. This was listed in the above Package.json file, and will have been added to your source code directory, under a new node_modules folder. Johnny-Five is based on node.js, and therefore works with a wide range of JavaScript libraries. It also includes a DSL for working with many different Actuators and Sensors, making it very easy to get started with!
Finally we are ready to run our first Johnny-Five script:
- Ensure your Arduino is connected to your Laptop (so that Johnny-Five can access the Firmata Protocol).
- Create the following LedBlink.js file in your source directory.
- At the command prompt, enter node LedBlink.js.
- Be amazed!
// Dependancy upon Johnny-Five
var five = require("johnny-five");

// Set up references to Arduino Board and LED
var myBoard, myLed;

// Initialise Microcontroller
myBoard = new five.Board();

// After successful initialisation of the board this code block will be run
myBoard.on("ready", function() {

 // Instantiate a LED Object (Arduino Uno has a LED attached to Pin 13)
 myLed = new five.Led(13);

 // Strobe the LED (ms)
 myLed.strobe( 300 );

});
If all goes well, you should see that the orange LED next to Pin 13 on the Arduino Uno strobes on and off.
The rate of strobing can be changed by amending the value assigned to myLed.strobe() and rerunning the example.
Confused about whats going on? It's pretty simple. Basically Johnny-Five is translating your JavaScript file and sending the relevant commands onwards to the Firmata Protocol which you installed on your Arduino Uno.
Using the REPL:
An advantage of using Johnny-Five is the ability to change things on the fly using the REPL. To try this out, add the following code to LedBlink.js (under the myLed.strobe call) and rerun the example:
// Add myLed to REPL (under name led)
this.repl.inject({
  led: myLed
});
Now you can interact directly with the led by typing in commands at the node REPL (the same command prompt where the example is running). Type in led.stop() to stop the strobing, led.toggle() to toggle the led on and off, or led.strobe(500) to start the strobing again.
This REPL functionality is very useful for prototyping, as well as gaining a quick understanding of how the Johnny-Five API works.
What Next?
Making a small LED flash on and off is fun for a short period, but quickly becomes boring. Luckily there are plenty of resources for helping you to get started with more exciting examples. I can personally recommend working through the following collections of tutorials:
The first collection of tutorials are based upon the Arduino Programming Language, while the second collection uses Johnny-Five. These collections have many tutorials in common, which is useful for comparisons sake and getting a wider picture of the Arduino Uno and how it works. In this tutorials you'll get experience with a whole range of components, including motors, buttons, buzzers, servos and much more! By purchasing an Arduino Experimenters Kit you'll get all the components you need to work through the aforementioned tutorials. Note that there are many vendors offering these kits so it should be easy to find one at a reasonable price. Finally, I can also recommend picking up a cheap Bluetooth module so that one can avoid having to physically connect the Arduino to your computer when running Johnny-Five!
Summary
I began this journey with no JavaScript, node.js or Arduino experience. In a short time, thanks to Johnny-Five I have been able to quickly prototype some pretty fun stuff (see below video)! What I like about Johnny-Five is how it simplifies working with the Arduino, so I can focus on learning JavaScript while also gaining a fundemental understanding of Arduino as a by product.
I'll be the first to admit that my knowledge of JavaScript is still far from being complete at this stage. But I have learnt a good deal about node.js, the npm packaging system and the JavaScript syntax.
Johnny-Five has an active and supportive community, which ensures that newbies such as myself quickly get help if they need it (you'd be best advised to use GitHub or Twitter if you are after a quick answer). The Johnny-Five API is consistent and intuitive and the REPL facility is a lot of help when getting started with the framework.
For me, one drawback of Johnny-Five is that it cannot currently cope with devices using pulse-length encoding (such as the Reflectance Sensor Array on my Pololu Zumo). This is because the implementation of such sensors would block processing, which is a no-no in node.js. Luckily there is an alternative sensor that Johnny-Five supports, but one should bear in mind that Johnny-Five doesn't support the entire Arduino ecosystem at this time.
If you have any questions or comments, feel free to contact me via twitter (@markawest)! You can also find plenty of good documentation and information at the Johnny-Five Github!
