Smarten up your Pi Zero Web Camera with Image Analysis and Amazon Web Services (Part 2)

Update 06 Aug 2018: In case you are interested, I've just published a new blog about creating an AI powered security camera using the Raspberry Pi and Movidius Neural Compute Stick!
Introduction
This blog post continues the story of how I reduced the amount of false positives triggered by my motion activated Raspberry Pi Zero security camera, by utilising Amazon Web Services (aka AWS).
Part One of this blog post focused on me finding a strategy for dealing with false positives. In summary I decided to try adding AWS Rekognition (a Cloud based image analysis service) to my security camera project. This would enable the solution to filter out false positives which in turn would reduce the amount of false email alerts I was receiving.
Moving to the Cloud
The original version of my Pi Zero Security Camera handled everything locally, from detecting movement to firing off alert emails. Adding AWS Rekognition to the solution required me to think differently. Did I really want the Pi Zero to make synchronous calls to AWS Rekognition, wait for a reply and then decide whether or not to send an email?
A more tempting alternative was to move the whole image processing solution to the Cloud as follows:
- The Pi Zero would focus on running the Motion Software. Any detected movement would result in a snapshot from the video stream being uploaded to the Cloud component.
- The Cloud component would call AWS Rekognition and send an alert email if the snapshot was found to contain one or more people.
This solution had the benefit of decoupling the Pi Zero and Cloud components (making it easier to change either one with minimal effect on the other).
With all this in mind I decided to build the whole image processing solution in Amazon's Cloud, using the following Amazon Web Service components:
- Lambda Functions: These allowed me to define and run code snippets (or microservices) in a serverless environment. My code snippets where written in Node.js, but one can also use Java, Python or C#.
- Step Functions: I used these to orchestrate the aforementioned Lambda Functions into an image processing workflow.
- s3: The destination for all image files uploaded from the Pi Zero.
- Simple Email Service (SES): Used to send emails from the image processing solution.
- IAM: Used to give all resources access to their required dependancies.
- Rekognition: Used for image analysis and elimination of false positives.
Both Rekognition and Step Functions are both relatively new additions to the AWS family, having been formally launched at the close of 2016.
Note that I had never used any of these services before! Luckily for me it was easy to get started thanks to good documentation and the occasional visit to stack overflow :)
Solution Overview
So how did all these components fit together?
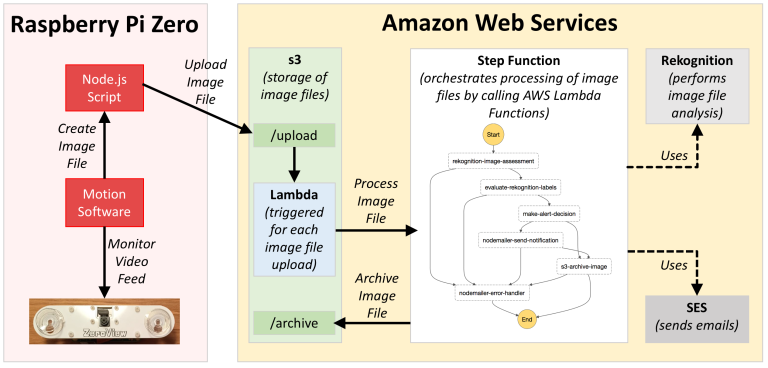
Lots of boxes, arrows and pretty pastel colours here - but what is actually happening? Let us begin at the Pi Zero:
- The Motion Software constantly monitors the camera's video feed.
- When Motion detects movement, it creates an image file (a snapshot of the event).
- The image file is uploaded from the Pi Zero to s3 via a Node.js script.
- Each file uploaded to the s3 /upload directory s3 triggers a Lambda Function that in turn activates a Step Function (in other words a separate Step Function instance is created for each image file).
- The Step Function orchestrates Lambda Functions into a workflow that process the image file. These Lambda Functions use the AWS Rekognition (for image analysis) and AWS SES (for sending emails) API's.
- After processing the image file is finally moved to the /archive directory in s3.
Although it is not shown in the above diagram, AWS IAM is also involved here, by ensuring that all components have access to the resources they need to do their job. For example, any resources trying to interact with s3 will receive a 403 (forbidden) error code unless their IAM Role contains the correct access permissions.
The Technical Details
The code for this solution can be found on GitHub, where I've also included tips for replicating this project. Creating components in AWS is pretty straightforwards and well documented, so rather than writing a complete "How To" guide I will summarise my experiences with some of the AWS components I used.
NODE.JS UPLOAD SCRIPT
Here you'll find the code for the upload script.
The easiest way to upload files to s3 is to use one of the many AWS SDK's. I chose to use the Node.js SDK which was quickly installed via the following steps:
- Install a recent version of Node.js and npm.
- Install the AWS SDK for Node.js by running this command (or alternatively add aws-sdk to you package.json file):
npm install aws-sdk
S3
s3 is an online storage service where objects are stored in "buckets" - basically logical storage units. Objects in buckets can be organised into directories. I started by creating an s3 bucket with 2 root directories:
- /upload : destination for all uploaded image files.
- /archive : storage of processed image files.
My next step was to make sure that an event would be triggered for each new upload. I did this by creating an s3 Notification that would trigger a Lambda Function for each Object Created event in the /upload directory.
LAMBDA FUNCTIONS
Here you'll find code for all the Lambda Functions used by the solution. A Lambda Function is basically a single unit of code with a standardised input and output. These functions run in Amazon's Cloud without any need for managing or provisioning servers. Serverless FTW!
The Lambda Function Handler
I created six Node.js Lambda Functions for this project, each with their own distinct task. In order to work with the AWS Lambda Function infrastructure you'll need to wrap your code with a handler. This looks like this:
exports.handler = (event, context, callback) = { ... your code ... };
This handler provides three objects:
- event: This contains input to the Lambda Function.
- context: This provides runtime information, such as request id, log information and so on.
- callback: This is used for returning information from the Lambda Function.
By using the event and callback parameters you can exchange information between Lambda Functions.This is especially important when orchestrating multiple Lambda Functions in a workflow via a Step Function.
Defining Lambda Functions
Lambda Functions can be defined in two ways:
- Via a browser based code editor (see rekognition-image-assessment for an example).
- Via uploading a Zip File (see nodemailer-send-notification for an example).
Zip Files are mainly used when you need to bundle up dependancies in your Lambda Function. Note that the AWS SDK is available to Lambda Functions by default, and usage of this does not require bundling. However if your Lambda Function uses a third party library then these dependancies will be need to be bundled up with the code in a Zip File.
Logging
Running Lambda Functions result in log files being created on AWS CloudWatch. Any calls to:
console.log( ... )
will be recorded here.
Configuration
The configuration of Lambda Function also allows you to amongst other things specify the amount of memory each function uses. When testing my nodemailer-send-notification Lambda Function I received a large amount of timeout errors. This function is responsible for sending alert emails with the attached image file. I figured the size of the attachment was part of the problem and therefore doubled the memory available to this function - from 128 to 256. This resolved the timeout errors.
Calling other AWS services via the AWS SDK
The AWS SDK is natively available to all Lambda Functions, and provides a mechanism for calling services such as Rekognition, SES and s3. To see examples of this, check out the following Lambda functions on GitHub:
- rekognition-image-assessment - calls Rekognitions detectLabels function.
- s3-archive-image - moves files in s3.
- nodemailer-error-handler - sends emails via AWS SES and NodeMailer (a third party plugin).
Summary
Lambda Functions are one of the more established AWS services, and this shows. It was really simple to get up and running with these, but I would advise working on your code locally before uploading it to AWS, as it the round trip between coding and testing is somewhat quicker.
STEP FUNCTIONS
Here you'll find a JSON File that defines a Step Function.
Step Functions are a new addition to the AWS portfolio, and give the possibility to orchestrate Lambda Functions (MicroServices) into State Machines or even workflows.
You create a Step Function by manually creating a JSON file in a in-browser editor. Blueprints are available to help you get started and you can generate a on the fly visualisation of your model at the press of the button. The Step Function uses a unique identifier or arn to identify the Lambda Functions it wishes to use.
My favourite feature of Step Functions is the Logging. Each instance of the Step Machine is logged and visualised as follows:
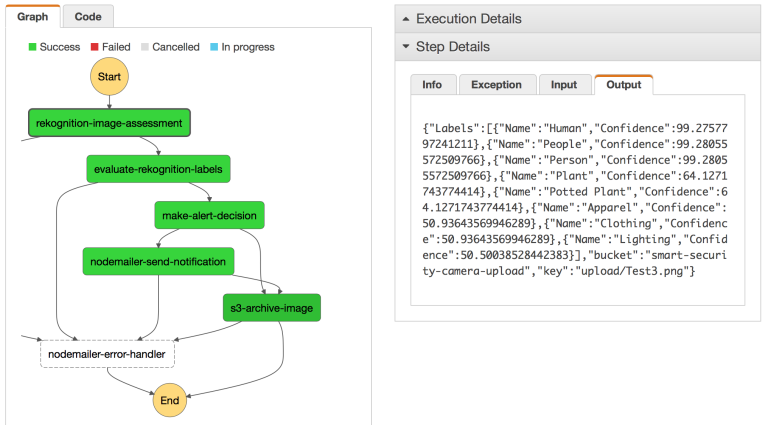
This feature makes it possible to drill through previous instances, in addition to following those that are currently executing. Inputs and output for each step are also available via this view. Perfect for debugging!
One aspect of Step Functions I disliked was that you cannot edit them once they are created. Instead you need to create a whole new Step Function from scratch. Adding a version number to the Step Function name is therefore a smart tactic.
IAM ROLES
You are required to specify a Role for each Step and Lambda Function you create. This Role specifies when resources these functions are allowed to access.
There are multiple ways in which you can specify roles, but perhaps the easiest way is to define these using the AWS IAM Console. In this console you can also see an overview of all the roles you have created.
See the various Lambda Functions in the project GitHub for examples of Roles I defined for this project.
AWS Costs
So how much does all this Cloud functionality cost? Surprisingly little. As a newcomer to AWS I was able to sign up for the AWS free tier which gives me the following for free:
- Lambda Functions: Up to 1 million requests per month, indefinitely.
- Step Functions: Up to 4,000 instances per month, indefinitely.
- SES: Up to 62,000 outbound message per month, indefinitely.
Frankly I doubt that my camera will ever exceed these thresholds. But if I do, the costs are minimal. For example 1,000 step function instances will cost me a grand total of $0.025!
The AWS free tier also gives me the following free of charge for the first 12 months:
- s3: 5GB of storage, 20,000 get requests and 2,000 put requests per month.
- Rekognition: 5,000 requests per month.
Again this is more than enough for my cameras requirements. Should my camera still be in operation in 12 months I can expect to incur the following costs:
- s3: $0.023 per GB storage, $0.004 per 10,000 GET requests and $0.005 per 1,000 PUT requests.
- Rekognition: $1.00 per month for up to 1,000 Image Analysis requests.
My camera doesn't create a lot of AWS traffic because it is pointing at a quiet back yard. 50 images a day is less than 20,000 a year so all this is pretty affordable from my perspective.
Adjustments to Motion
I also made a few further adjustments to the same Motion configuration file that I originally defined when building the security camera:
- I changed the on_picture_save parameter to call the s3 upload script by setting the value to /usr/local/bin/scripts/s3-upload/process-picture.sh smart-security-camera-upload %f. See s3-upload on GitHub for more information about this.
- I changed the quality parameter to 100. My reason for doing this was to provide Rekognition with the best possible quality of image files.
- I changed minimum_motion_frames from 1 to 2. This means that two frames of movement need to be detected before a motion event is triggered.
- I set text_double to on. This was a purely cosmetic change that doubled the size of the text displayed on the image.
- I set text_left to GardenCam. Another cosmetic change that identifies my camera.
I will probably continue to tweak Motion as I gather more results from field testing the camera. All changes to the Motion configuration file will be documented on GitHub.
Initial Results
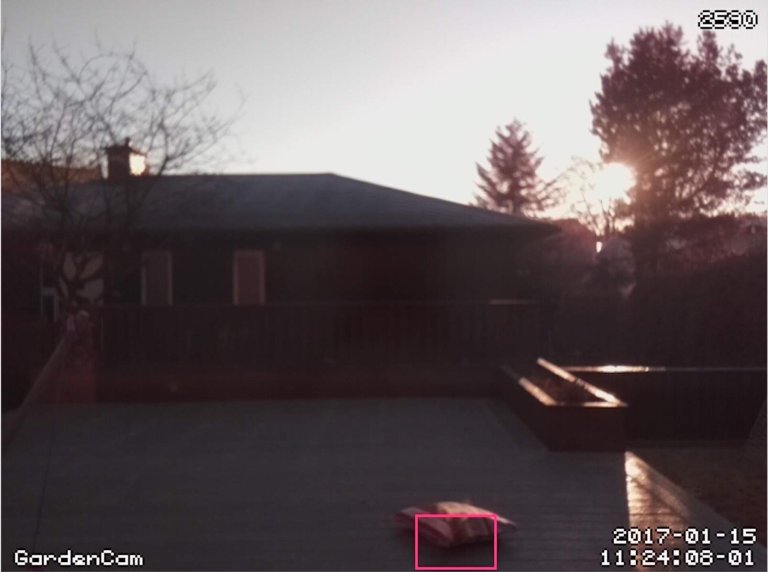
A weekends field testing of the complete solution yielded favourable results. False positive images are now successfully filtered out by the AWS image processing solution, which means that I no longer receive false alarm emails for pictures such as this:
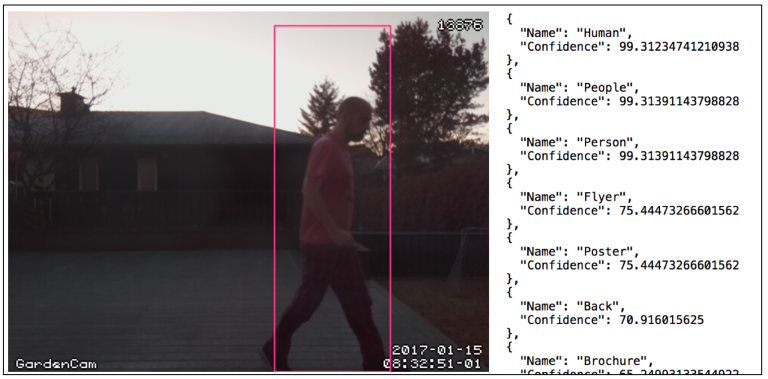
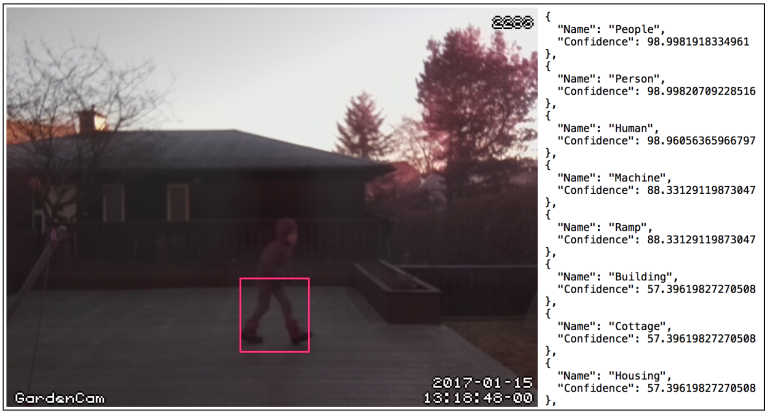
The solution also successfully dealt with images containing people. In the below example you can see that my lab assistant / daughter was correctly identified as a "Human" and a "Person". This was despite low light, motion blur and her head being partially covered.
Ongoing Work
Although I am happy with the solution, I can't resist making a few more tweaks. Here's my plan for the next few weeks:
- Tweaking the Motion configuration file to improve the image files being sent to Rekognition (and perhaps resolve the issue where Rekognition misses people in the images).
- Improve formatting of alert emails.
- Improve error handing and logging.
- Add /falsepositive, /alert and /error subdirectories under /archive (and change the Step Function to use these).
If you'd like to follow these changes and others, they will be made available from the project GitHub as and when I implement them.
Overall Conclusion
This project has been one of the most rewarding hobby projects I have worked with, mainly because it introduced me to how I could smarten up my Raspberry Pi projects by the power of the Cloud!
- Using Amazon Web Services has been a positive experience. The documentation and examples for the Node.js SDK is of good quality and well structured, even for the newer services such as Step Functions. I've also picked up some skills that could be applied in my day job.
- Editing Lambda and Step Functions via the in-browser code editor was perhaps the most cumbersome part of this project. At the time of writing it doesn't seem that IDE support for AWS is widespread, and it would be nice to see this situation improve.
- Lambda Functions are great. Theres no need to worry about server configuration or provisioning as this is all taken care of. They lend themselves well to a microservice architecture and provide massive scalability out of the box.
- Rekognition is an amazing service, and by using it to remove false positives I've only scratched the service of it's potential. By making a simple change to my code I could enable my camera to perform facial detection, recognition and sentiment analysis.
So that's it for now. If you have any comments or questions please share them in the comments below. You can also find me under @markawest on Twitter.
Thanks for reading!